Love your mountain bike but hate the climbs? An electric conversion gives you power without losing the bike you trust. This guide shows you how to add a motor and battery, turning tough trails into fun rides.
Yes, you can convert a mountain bike to electric. Using a conversion kit, you can add a motor, battery, and controller to most standard mountain bikes. This process allows you to keep your existing bike frame while gaining the benefits of electric power. Key choices include hub motors for simplicity or mid-drive motors for better performance on hills. The result is a custom e-bike perfect for your riding style.
So, how do you get started? Let’s break it down.
1. What Does It Mean to Convert a Mountain Bike to Electric?
Converting a mountain bike to electric means adding a motor and a battery. You use a special kit to do this. This turns your regular bike into an electric one. You keep the bike you already love.
This process does not require you to buy a whole new bicycle. The best part? You get to choose the power level and battery size. This gives you a custom ride that fits your needs.
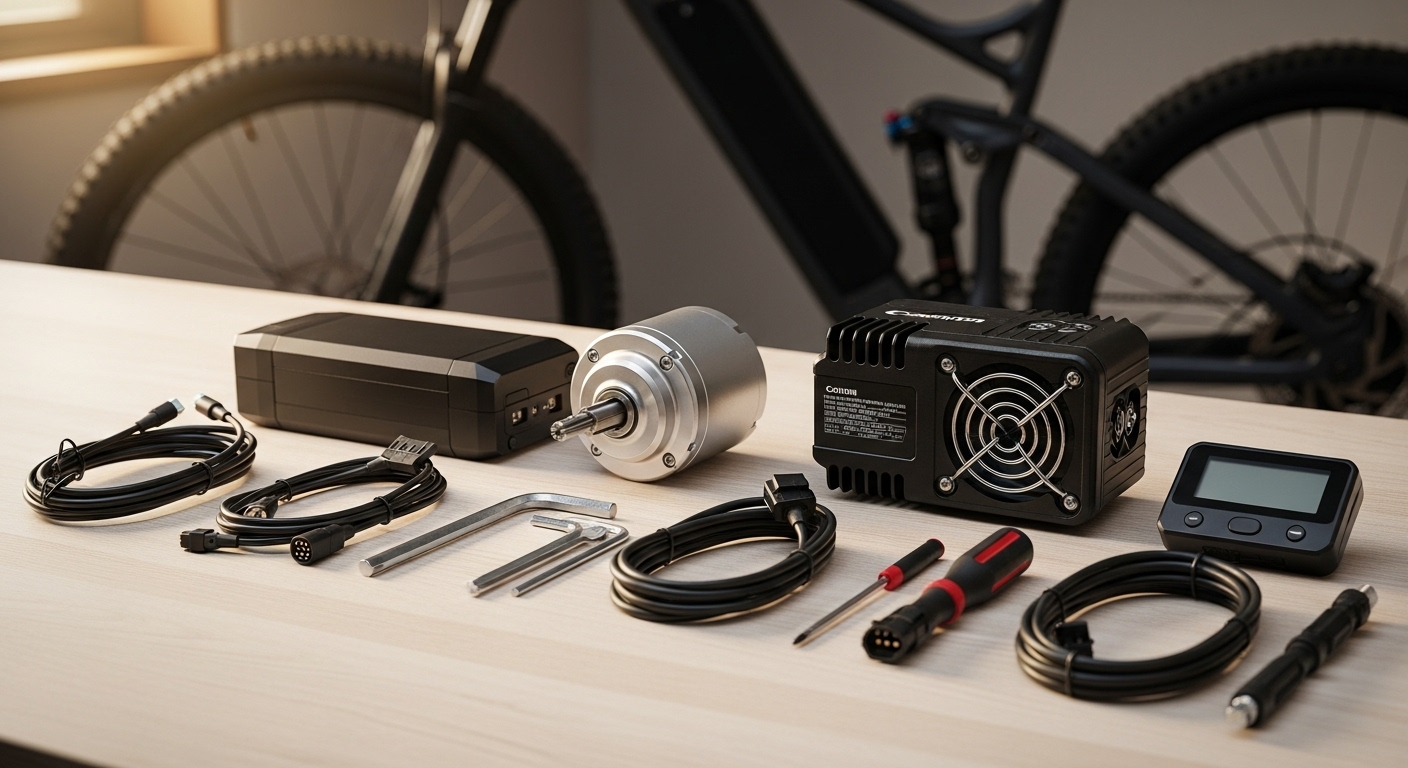
A conversion kit includes a few key parts. You get a motor, a battery, and a controller. You also get a throttle and sensors. These parts work together to give you electric power.
The controller is the brain of the system. It manages power from the battery to the motor. The throttle lets you control the speed. Pedal-assist sensors tell the motor when you are pedaling.
| Component | Function |
| Motor | Provides electric power to the wheels. |
| Battery | Stores and supplies energy to the motor. |
| Controller | Manages power flow and system settings. |
There is a big difference between a conversion and a pre-built e-MTB. A conversion uses your existing bike frame. You know how it handles. A pre-built e-MTB is a complete bike designed from the start to be electric.
Conversions offer more freedom. You can mix and match parts. Pre-built bikes offer a simpler solution. But they can cost a lot more.

2. What Are the Key Benefits of Converting Your Mountain Bike?
Converting your mountain bike to electric offers many good things. The biggest one is saving money. A new electric mountain bike can be very expensive. A conversion kit costs much less.
This lets you enjoy electric-assist riding on a smaller budget. This is important because it makes e-biking accessible to more people. It is a smart way to get more from your bike.
You also get to keep the bike you already know. Your mountain bike fits you perfectly. You are used to how it feels on the trail. A conversion lets you keep that same frame and fit.
This makes the transition to an e-bike much smoother. You feel comfortable and confident from the first ride. This is a huge plus for riders who love their current setup.
Custom options are another big benefit. Conversion kits let you choose your motor and battery. You can decide how much power you want. You can also pick a battery that gives you the range you need.
Want more speed for open trails? Choose a powerful motor. Need a long range for epic adventures? Get a bigger battery. You can build a bike that is perfectly matched to your riding style.
| Benefit | Description |
| Cost Savings | Spend less than you would on a new e-MTB. |
| Familiarity | Keep the bike frame and geometry you are used to. |
| Customization | Choose the motor power and battery range you want. |
| Eco-Friendly | Upgrade existing gear instead of buying new. |
Finally, converting your bike is a good choice for the planet. You are reusing your existing bike instead of buying a new one. This reduces waste and the resources needed to make a new product.
Upgrading your bike is a responsible choice. It extends the life of your gear. You get a better ride while also helping the environment.
| Conversion vs. New E-MTB | Conversion | New E-MTB |
| Cost | $600-$1200 | $2500-$5000+ |
| Familiarity | Keep your bike | Learn new bike |
| Customization | High | Limited |
3. What Components Do You Need for an E-Bike Conversion?
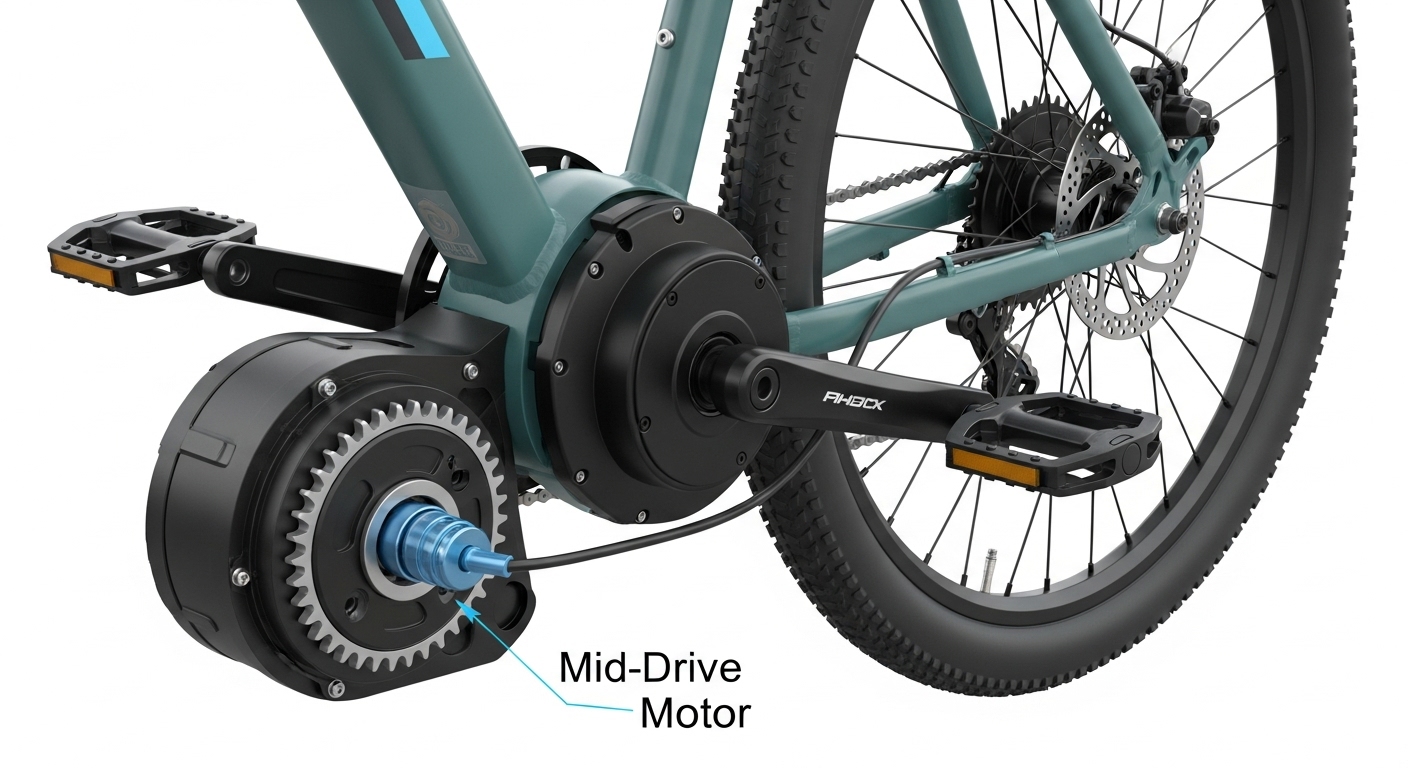
To convert your mountain bike, you need a few key parts. The motor is the most important. There are two main types: hub motors and mid-drive motors. Hub motors go in the center of your wheel. Mid-drive motors are installed near the pedals.
Hub motors are simpler and often cheaper. Mid-drive motors are better for climbing hills. They use the bike’s gears to work more efficiently. Here’s the deal: for serious mountain biking, a mid-drive motor is usually the better choice.
The battery is the next big component. It determines how far you can ride. Battery capacity is measured in amp-hours (Ah) and voltage (V). A higher Ah rating means a longer range.
Most conversion kits use lithium-ion batteries. They are lightweight and hold a lot of energy. Look for a battery that is removable. This makes it easier to charge.
| Motor Type | Best Use Case |
| Front Hub Motor | Flat terrain, commuting |
| Rear Hub Motor | General use, good traction |
| Mid-Drive Motor | Hill climbing, technical trails |
You will also need a controller and a display. The controller is the system’s brain. It connects the battery, motor, and other parts. The display shows you important information like speed and battery level.
Some displays are simple LED screens. Others are more advanced LCDs. Make sure it is easy to read and use while riding.
Finally, you need a throttle and pedal-assist sensors. A throttle lets you use the motor without pedaling. Pedal-assist sensors (PAS) tell the motor when you are pedaling. The motor then adds power to help you.
A PAS system gives a more natural riding feel. Most kits include both a throttle and a PAS. This gives you the freedom to choose how you want to ride.
4. How Do You Choose the Right Conversion Kit?
Choosing the right conversion kit is a big decision. First, think about your power needs. For mountain biking, you need enough power to climb steep hills. A motor with at least 500 watts (W) is a good starting point.
More power helps you get up climbs without getting tired. Now, you might be wondering about the legal limits. Be sure to check your local laws. Some areas have limits on motor wattage for e-bikes.
Next, consider the battery. A 48V battery is a common choice for mountain bikes. It provides a good balance of power and efficiency. For range, look at the amp-hour (Ah) rating. A 13Ah battery is a good all-around option.
If you plan on long rides, a higher Ah rating is better. Think about where you will mount the battery. The downtube is a popular spot. It keeps the weight low and centered.
| Feature | Recommendation for MTB |
| Motor Power | 500W minimum, 750W+ for steep trails |
| Battery Voltage | 48V for good power and efficiency |
| Battery Capacity | 13Ah for all-around use, 17Ah+ for long rides |
Compatibility with your bike frame is very important. Not all kits fit all bikes. Check the measurements of your bike’s bottom bracket for a mid-drive motor. Most sellers provide detailed fit guides.
Take the time to measure your bike carefully. This will save you a lot of frustration later. If you have a full-suspension bike, check for clearance.
Your budget also plays a big role. Conversion kits can range from a few hundred to over a thousand dollars. It is often worth paying more for a quality kit from a trusted brand.
A good kit will last longer and perform better. Look for brands with good reviews and a solid warranty. This gives you peace of mind.

5. What Is the Step-by-Step Process to Convert Your Bike?
Converting your bike is a project you can do at home. Before you start, inspect your bike. Make sure the frame is in good condition. Check the brakes and tires. Clean your bike thoroughly.
Gather all your tools. You will need basic bike tools like Allen keys and wrenches. Let me explain the general steps. The exact process will vary depending on your kit.
First, install the motor. For a hub motor, you will replace your front or rear wheel with the new motor wheel. For a mid-drive motor, you will remove your cranks and bottom bracket. The motor unit will mount in their place.
Follow the instructions carefully. Make sure everything is tight and secure. This is the most technical part of the job. Take your time and do it right.
| Step | Key Action |
| 1. Preparation | Inspect and clean your bike; gather tools. |
| 2. Motor Install | Replace wheel (hub) or bottom bracket (mid-drive). |
| 3. Battery Mount | Attach the battery holder to the frame. |
| 4. Wiring | Connect all components to the controller. |
| 5. Testing | Check all functions before your first ride. |
Next, mount the battery. Most batteries mount on the downtube. The kit will come with a mounting plate. Attach this plate to your frame using the bottle cage bolts. Make sure it is secure.
Slide the battery onto the mount. It should click into place. Most have a lock to keep them secure. This also prevents theft.
Now, connect all the electronics. This includes the controller, display, throttle, and sensors. Mount the display on your handlebars. Run the wires along your frame. Use zip ties to keep them neat.
The controller is the hub for all these connections. Each wire is usually labeled or color-coded. Plug everything into the correct spot. Double-check all connections before moving on.
Finally, it is time to test the system. Turn on the battery. The display should light up. Lift the powered wheel off the ground. Gently use the throttle. The wheel should spin.
Check the brakes. Make sure the motor cuts off when you pull the brake levers. This is a key safety feature. If everything works, you are ready for a test ride.
6. What Are the Common Challenges and How to Overcome Them?
Converting a bike is not always simple. You might face some challenges. One common issue is weight distribution. A motor and battery add a lot of weight to your bike. This can change how it handles.
A mid-drive motor keeps the weight low and centered. The bottom line? Think about where the weight is going. Try to keep it as balanced as possible. This will make your converted bike safer and more fun to ride.
Frame compatibility is another big hurdle. Not all frames have space for a battery. This is especially true for full-suspension bikes. You might need to get creative with mounting.
Before you buy a kit, measure your frame carefully. Check the seller’s fit guide. Look at pictures of similar bikes that have been converted. If you are not sure, ask the seller for advice.
| Challenge | Solution |
| Weight Distribution | Choose a mid-drive motor; mount battery low and centered. |
| Frame Compatibility | Measure carefully before buying; consider alternative battery mounting. |
| Legal Restrictions | Research local laws on motor power and speed limits. |
| Maintenance | Learn basic e-bike maintenance; check components regularly. |
Legal restrictions can be a headache. E-bike laws vary by location. Some trails may not allow e-bikes at all. Other places have limits on motor power and speed. Do your research before you ride.
This will help you avoid fines and keep trails open for everyone. Be a good ambassador for the sport. Ride responsibly and respect the rules.
Maintenance is another thing to consider. An e-bike has more parts than a regular bike. The motor and battery need care. Chains and cassettes can wear out faster. Brakes will also see more use.
Learn how to do basic maintenance. Keep your chain clean and lubed. Check your brake pads often. A little bit of care will keep your converted bike running smoothly.
Safety is the most important thing. The extra speed and weight of an e-bike change how you ride. Take time to get used to the new feel. Wear a helmet and other protective gear.
Be extra careful on trails with other users. Announce your presence when passing. Ride in control at all times.

7. How Much Does It Cost to Convert a Mountain Bike to Electric?
One of the main reasons to convert your bike is to save money. But how much does it actually cost? The price of conversion kits can vary a lot. You can find basic kits for as little as $300. High-end kits can cost over $1500.
For a good quality mountain bike conversion, expect to spend between $600 and $1200. But here’s the thing: you often get what you pay for. A cheap kit might not last long on rough trails.
It is wise to invest in a kit from a reputable brand. These kits use better parts. They are more likely to be reliable and safe. They also come with better warranties and customer support.
Don’t forget to factor in other costs. You might need to buy some special tools. You might also want to upgrade your brakes. Better brakes are a good idea for the higher speeds of an e-bike.
| Cost Factor | Price Range (USD) |
| Conversion Kit | $600 – $1200 |
| Professional Install | $150 – $300 |
| Tools & Upgrades | $50 – $200+ |
If you are not comfortable doing the installation yourself, you can pay a bike shop to do it. The cost for professional installation can range from $150 to $300. This is a good option if you want to be sure the job is done right.
So, how does this compare to buying a new e-MTB? A new electric mountain bike from a major brand will cost at least $2500. High-end models can be $5000 or more. A conversion can save you a lot of money.
There are also long-term savings. Electricity is much cheaper than gas. If you use your e-bike for commuting, you can save money on fuel and parking. You are also getting exercise and having fun.
Conclusion
Converting your mountain bike to electric is a great way to get more out of your rides. It saves you money compared to buying a new e-MTB. You get to keep the bike you love, just with added power. You can customize the motor and battery to fit your needs perfectly. The process is a rewarding project that leaves you with a bike that is uniquely yours. You get a faster, more capable ride that makes climbing hills fun. This opens up a whole new world of trails and adventures for you to enjoy.
Ready to feel the power of an electric boost on your favorite trails? The team at Dynamic Scooter can help you choose the right high-performance kit to start your conversion journey. Contact us today to build your dream Electric Mountain Bike Q5.
FAQ
Q1: Is it legal to convert my mountain bike to electric?
Yes, but it depends on local laws. Most regions allow e-bikes up to 750W (US) or 250W (EU) with speed limits of 20-28 mph. Check your local regulations for trail access and motor power limits before converting.
Q2: Can any mountain bike be converted to electric?
Most mountain bikes can be converted, but you need a sturdy frame, disc brake mounts, and enough space for the battery and motor. Full-suspension bikes may have limited battery placement options compared to hardtails.
Q3: How long does the battery last on a converted e-MTB?
Battery life depends on capacity, terrain, rider weight, and assist level. A 48V 13Ah battery typically offers 25-40 miles in pure electric mode and 50-60 miles with pedal assist on mixed terrain.
Q4: Do I need special tools to install a conversion kit?
Basic tools like wrenches, screwdrivers, and Allen keys are usually enough. Some kits may need a torque wrench or cable cutters. If you’re not comfortable with bike mechanics, professional installation is recommended.
Q5: Will converting my bike void its warranty?
Yes, most bike manufacturers will void the warranty if you modify the frame or drivetrain. Check your warranty terms before converting, and consider using a conversion kit that minimizes permanent changes.