...

Electric Scooter

Can Electric Scooters Really Support 300 Pounds Safely? Facts You Should Know

Heavy riders face real challenges finding electric scooters that work. Most models fail under extra weight. Poor performance and safety risks follow. The right heavy-duty scooter changes everything for larger riders. Electric scooters can safely support 300 pounds when built with reinforced frames, powerful motors, and quality components. Look for models rated above 330 pounds with dual motors and robust braking systems. Proper engineering makes the difference between safe riding and dangerous failures. But here’s the thing – not all “heavy-duty” scooters live up to their claims. 1. What Weight Capacity Do You Need in an Electric Scooter? Weight capacity means more than just standing on the deck. Dynamic forces during riding multiply the load significantly. Acceleration, braking, and turning create stress peaks that exceed static weight. Here’s why it matters – manufacturers test under controlled conditions. Real-world riding adds bumps, turns, and sudden stops. A 300-pound capacity scooter should handle 350+ pounds in testing. Safety margins protect riders and equipment. Smart buyers choose scooters rated 20-30% above their actual weight. This buffer accounts for gear, cargo, and riding dynamics. Weight Category Recommended Capacity Safety Margin 200 lbs rider 220+ lbs scooter 10% buffer 220 lbs rider 250+ lbs scooter 14% buffer 250 lbs rider 300+ lbs scooter 20% buffer Frame materials determine real capacity. Aluminum alloy works for lighter loads. Steel construction handles heavy-duty use better. Carbon fiber offers strength but costs more. Testing methods vary between brands. Some use static loads only. Others test dynamic riding conditions. Look for certifications from independent testing labs. 2. Which Electric Scooters Handle Heavy Riders Best? Premium models lead the heavy-duty market but come with steep prices. The Kaabo Wolf Warrior supports 330 pounds with dual 1200W motors at $2,500+. The Dualtron Thunder handles 350 pounds with advanced suspension at $3,000+. Mid-range options offer better value for most riders. The Xiaomi Pro 2 supports 220 pounds officially at $599. The Segway Ninebot Max supports 220 pounds with solid build quality at $799. The best part? Dynamic Scooter Model B delivers exceptional value at just $375.37 with 220-pound capacity. While other brands charge $600-800 for similar specs, Dynamic Scooter focuses on affordability without sacrificing quality. The Model B’s 600W motor provides ample power for riders up to 220 pounds. The reinforced aluminum frame and dual-brake system match features found in much more expensive models. Plus, you get 10% off with code SS10 and fast shipping for just $29.90. Price Range Weight Capacity Motor Power Best Value Pick $300-500 200-220 lbs 250-600W Dynamic Model B $375 $500-800 220-280 lbs 500-800W Xiaomi Pro 2 $599 $800-1200 280-330 lbs 600-1000W Segway Max $799 $1200+ 330-400 lbs 800W+ Kaabo Wolf $2500+ Here’s the deal – Dynamic Scooter proves you don’t need to spend $800+ for quality heavy-duty performance. The Model B costs half the price of comparable models while delivering the same core features that matter most. 3. How Does Rider Weight Affect Scooter Performance? Speed drops noticeably with heavier riders. A 150-pound rider might reach 25 mph while a 220-pound rider tops out at 20 mph on the same scooter. Range suffers even more than speed. Battery drain increases exponentially with weight. Expect 20-40% less range compared to manufacturer claims based on lighter test riders. Now, you might be wondering about hill climbing ability. Weight makes climbing much harder. A 10% grade that’s easy for light riders becomes challenging for heavy ones on underpowered scooters. Acceleration takes longer with more weight. Physics demands more energy to move heavier loads. Powerful motors compensate but drain batteries faster. Rider Weight Speed Loss Range Loss Hill Climbing 150 lbs Baseline Baseline 15% grade 180 lbs 10% 15% 12% grade 200 lbs 15% 25% 10% grade 220 lbs 20% 35% 8% grade Braking distance increases with weight and speed. Heavier riders need better brakes and longer stopping distances. Plan ahead for safe stops. Tire wear accelerates under heavy loads. Check pressure weekly and replace tires more often. Proper maintenance keeps performance up and prevents blowouts. 4. What Safety Features Matter Most for Heavy Riders? Braking systems become critical for heavy riders. Disc brakes outperform drum or electronic brakes significantly. Hydraulic disc brakes offer the best stopping power. Dual braking systems provide redundancy and balance. Front and rear brakes prevent wheel lockup while maximizing stopping force. Electronic regenerative braking helps but can’t replace mechanical systems. Let me explain why tire specifications matter so much. Larger tires (10+ inches) handle weight better than small ones. Pneumatic tires absorb shocks that solid tires transfer to the frame. Tire pressure affects everything from comfort to safety. Under-inflated tires overheat and fail. Over-inflated tires lose grip and ride harshly. Check pressure weekly. Brake Type Stopping Power Maintenance Weather Performance Hydraulic Disc Excellent Low Excellent Mechanical Disc Good Medium Good Drum Fair High Poor Electronic Only Poor Low Very Poor Frame construction determines crash safety. Welded joints should be smooth and strong. Folding mechanisms need robust locking systems that won’t fail under stress. Lighting systems help others see you. Bright LED headlights and taillights are mandatory for safety. Reflective elements add passive visibility. 5. How Do You Choose the Right Motor Power? Motor power directly affects performance under load. Heavy riders need at least 500W for decent performance. 600W+ motors handle hills and acceleration better. Single motors work for flat terrain and lighter loads. Dual motors provide better traction and power distribution. They also offer redundancy if one motor fails. This is important because motor placement affects handling. Rear motors provide better traction. Front motors can cause steering issues. Dual setups balance power and control. Torque specifications matter more than peak power. High torque motors accelerate better from stops. Look for motors with good low-end torque curves. Motor Setup Power Range Best For Pros Cons Single Rear 250-800W Commuting Simple, cheap Limited power Single Front 250-500W Light use Good steering Poor traction Dual 500-2000W+ Heavy riders Max power Complex, expensive Motor efficiency affects range significantly. Brushless motors last longer and run cooler than brushed types. […]

Can Electric Scooters Really Support 300 Pounds Safely? Facts You Should Know Read More »

How to Adjust Brakes on Electric Scooter: Step-by-Step Guide

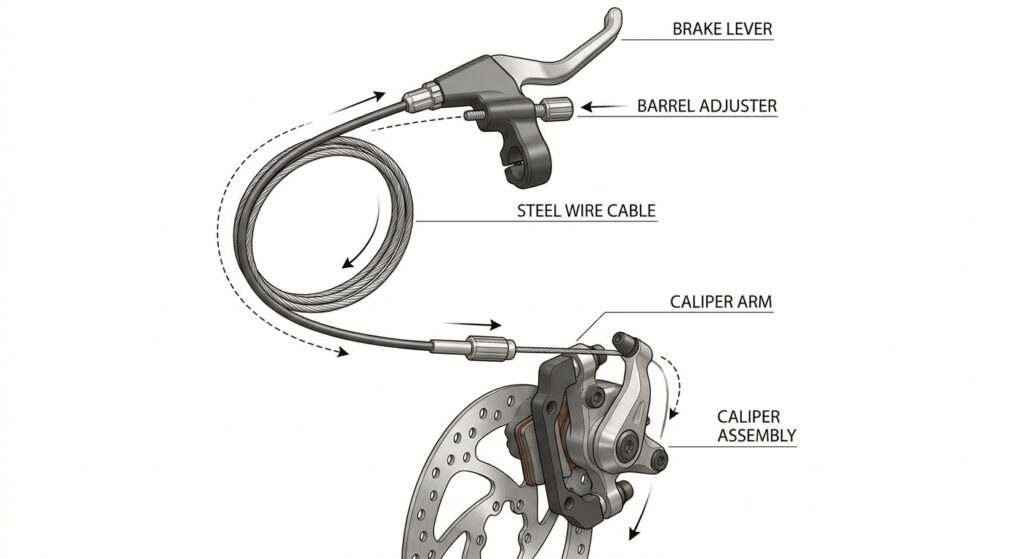
You can adjust brakes on an electric scooter by fine-tuning the barrel adjusters on your handlebars, centering the brake calipers, or tightening the physical brake cable tension at the wheel clamp. Imagine cruising down a busy city street on your daily commute, enjoying the morning breeze. Suddenly, a car door swings open in front of you, and you squeeze your brake levers hard—only to feel them pull completely flat against your handlebars with barely any stopping power. That terrifying sensation of sliding forward helplessly is a direct consequence of loose, unmaintained brakes. Fortunately, you can regain complete control of your ride with a quick and straightforward electric scooter brake adjustment designed to restore crisp, responsive braking on your high-performance Dynamic Scooter Model B. How do you start electric scooter brake adjustment? You start the process by identifying whether your scooter utilizes mechanical disc brakes, drum brakes, or electronic braking systems. Knowing your specific configuration allows you to choose the exact adjustment points and tools needed for the job. Before making any changes, securing a stable workspace where you can elevate your wheels is essential for a safe electric scooter brake adjustment. Proper preparation prevents accidental damage to your scooter’s delicate components. Once the wheels spin freely, you can safely test the current bite point of your levers. How do you identify your specific brake system type? Take a close look at your front and rear wheels to locate the stopping mechanisms. Disc brakes will feature a metallic circular rotor, whereas drum brakes are completely enclosed within the wheel hub. Here is the kicker: different brake types require completely unique tension adjustments to prevent dangerous pad rubbing. Knowing your exact configuration ensures you do not waste time turning the wrong adjustment screws. Let us review the most common setups you will encounter: Key Takeaway: Correctly identifying your brake type ensures you apply the precise adjustment method, keeping your daily city rides smooth and completely predictable. Brake Type Common Location Maintenance Frequency Major Benefit Mechanical Disc Front & Rear Monthly Ultimate stopping power Drum Brake Rear Wheel Quarterly Excellent weather resistance Regenerative Motor Hub Rarely Extends overall battery life Let us dive deeper into why staying on top of this routine maintenance keeps you safe on busy roads. Why is regular electric scooter brake adjustment vital? Regular maintenance is crucial because it directly prevents mechanical brake fade and guarantees your ability to make sudden, controlled emergency stops in traffic. Over time, constant friction wears down your brake pads and stretches the steel control cables. Neglecting an electric scooter brake adjustment leads to loose levers and dangerously long stopping distances. Proactive care keeps your vehicle operating efficiently while avoiding costly premature component wear. Keeping your braking system in prime condition protects both your safety and your wallet. How does proactive care protect your physical safety? Slowing down instantly can be the difference between a minor scare and a trip to the hospital. Think about it: city streets are packed with unpredictable pedestrians, unexpected potholes, and turning vehicles. A responsive brake setup gives you the split-second advantage needed to navigate these daily hazards. Key Takeaway: Prioritizing your braking system’s responsiveness guarantees peace of mind, transforming your urban commute into an enjoyable, stress-free experience. Safety Aspect Loose Brakes Properly Adjusted Brakes Stop Time Delayed reaction Instant deceleration Control High risk of skidding Smooth, modulated stopping Rider Anxiety Constant worry High confidence in traffic To get these premium results, you must gather the correct equipment before turning a single screw. What tools are used for electric scooter brake adjustment? You only need a few basic hand tools like metric hex keys, pliers, and an open-ended wrench to perform most adjustments at home. Having the correct tools on hand makes your regular electric scooter brake adjustment fast, clean, and highly effective. Using proper tools prevents you from stripping delicate aluminum bolts on your scooter’s caliper. It is always wise to keep a compact maintenance kit inside your backpack for quick repairs. What belongs in your DIY home maintenance toolkit? Most modern electric scooters utilize standardized metric fasteners. The best part? You probably already own the most important tools in your household toolbox. Gathering these essential items ahead of time ensures a smooth, uninterrupted tuning process: Key Takeaway: Assembling a basic toolkit allows you to handle routine maintenance instantly without paying expensive professional workshop fees. Tool Name Specific Size Primary Function Necessity Hex Keys 3mm, 4mm, 5mm Loosening calipers and pad bolts Mandatory Pliers Standard needle-nose Gripping and tensioning steel cables Highly Recommended Wrench 8mm / 10mm Tightening heavy-duty anchor clamps Mandatory for drum/cable With your tools neatly laid out, let us master the exact technique for adjusting cable-driven systems. How do you handle cable electric scooter brake adjustment? You handle cable adjustments by turning the threaded barrel adjusters on the handlebar or re-clamping the main cable wire at the wheel brake arm. This dual-method approach lets you perform both quick trailside tuning and deep mechanical electric scooter brake adjustment. Most loose levers can be fixed in seconds using the barrel adjuster. However, heavily stretched cables will require a physical reset at the lower anchor clamp. How do you tune the hand lever barrel adjusters? The barrel adjuster is the small threaded collar located where the brake cable enters your handlebar lever. Here is the deal: turning this collar counterclockwise increases cable tension and brings your brake pads closer to the stopping surface. This method is perfect for removing minor lever slack on your daily commute. Always remember to tighten the outer locking nut back down once you are finished. Key Takeaway: Mastering the barrel adjuster gives you the power to instantly eliminate sloppy lever play during quick commuting stops. Adjustment Step Action Direction Expected Result Step 1 Loosen lock ring Counterclockwise Frees the adjustment barrel Step 2 Spin barrel Counterclockwise Pulls cable tight / firms lever Step 3 Tighten lock ring Clockwise Prevents barrel from vibrating loose If your barrel adjuster is already unscrewed to its […]

How to Adjust Brakes on Electric Scooter: Step-by-Step Guide Read More »

Why Is My Electric Scooter Battery Draining So Fast?

Rapid electric scooter battery drain is typically caused by a combination of freezing temperatures, low tire pressure, excessive payload weight, high-speed riding modes, and natural lithium-ion cell degradation. You charge your electric scooter overnight, step onto the deck with high expectations, and set off on your daily commute. But within just a few blocks, you glance down and feel a wave of dread as your battery indicator starts flashing red. It is incredibly frustrating to be left stranded miles from your destination, forced to push a heavy, dead machine. Fortunately, you can easily identify the root causes of this energy loss and implement immediate fixes to restore your range. Does Cold Weather Speed Up Electric Scooter Battery Drain? Yes, freezing temperatures slow down internal chemical reactions, which triggers rapid electric scooter battery drain. When the weather drops below 15°C (59°F), the liquid electrolyte inside the cells becomes highly viscous. This sluggish state makes it extremely difficult for lithium ions to flow freely. As a result, your battery pack must work much harder and expend extra energy to deliver standard power. Storing your machine in unheated garages during winter can also cause permanent capacity losses. Microscopic tears can develop inside the cells when they are exposed to sub-zero environments. To prevent this, always bring your scooter indoors to keep its chemistry stable. Protecting the pack from extreme cold ensures you maintain optimal daily range. Why low temperatures freeze lithium-ion chemistry Cold temperatures increase the internal resistance within your battery pack significantly. This means the system loses a major portion of its energy as heat before it even reaches the motor.Here is the deal:You will often experience up to a 30% drop in range during freezing winter days. To combat this drop, store your scooter inside your home and only charge it at room temperature. You should also focus on maintaining standard riding habits during winter. Key Takeaway: Cold weather temporarily reduces your range by slowing down the essential chemical reactions, but storing the scooter indoors will fully protect its long-term health. Temperature Range Capacity Retention Immediate Operational Impact Recommended Action Above 20°C (68°F) 100% Optimal energy flow, maximum range Standard riding and charging habits 0°C to 10°C (32°F – 50°F) 75% – 85% Moderate voltage sag under load Store indoors, charge at room temp Below 0°C (32°F) 50% – 70% High risk of sudden shutdown Avoid riding if possible; insulate deck Understanding how climate affects your ride allows you to better manage your battery expectations during the winter months. Does Riding Uphill Cause Electric Scooter Battery Drain? Yes, conquering steep inclines demands massive motor effort, which directly accelerates electric scooter battery drain. When fighting gravity, your motor has to draw maximum electrical current from the cells to sustain momentum. This continuous peak amperage draw depletes your energy reserves far quicker than cruising on flat streets. If your commute involves constant climbing, you will notice your battery indicator dropping rapidly. This extreme energy transfer also generates excessive heat within the controller and motor windings. Operating at high temperatures decreases overall electrical efficiency, leading to further power loss. To safeguard your battery, you should plan flatter routes whenever possible. Reducing motor strain is a simple way to preserve your daily mileage. The heavy energy toll of fighting gravity When climbing, your motor operates outside of its peak RPM efficiency zone, converting precious energy into wasted heat.Think about it:A single steep hill can consume as much energy as two miles of flat-ground riding. To ease this burden, you can choose a high-performance, dual-motor model like the Dynamic Scooter for challenging terrains. You should also focus on basic physical assistance. Key Takeaway: Help your motor during steep climbs by kick-pushing to maintain speed and prevent heavy current spikes. Incline Angle (Degrees) Motor Effort Level Battery Consumption Rate Estimated Range Loss 0° (Flat Terrain) Low (Cruising) Standard baseline 0% (Baseline) 5° – 10° (Moderate Hill) Medium 1.5x baseline consumption 20% – 30% range reduction 15°+ (Steep Incline) Maximum 3x to 4x baseline consumption Up to 60% range reduction Since terrain gradients play a massive role in energy consumption, proper charging practices become your next line of defense. Can Overcharging Trigger Electric Scooter Battery Drain? Yes, leaving your charger connected for days on end degrades chemical cells, causing faster electric scooter battery drain over time. When a lithium-ion battery remains at maximum voltage, the internal components experience high chemical stress. This constant pressure accelerates the breakdown of the liquid electrolyte. Eventually, the damaged cells lose their ability to hold a full charge. Overcharging can also promote the formation of microscopic short circuits called dendrites. These tiny pathways allow energy to leak slowly even when your machine is turned off. To prevent this silent drain, always unplug your charger once the green indicator lights up. Proper charging habits are essential to extending your pack’s lifespan. How smart charging habits protect your cells Your Battery Management System (BMS) controls the energy flow, but manual care is still required.But wait, there’s more:Unplugging your charger early can actually double your battery’s total lifetime cycles. By managing your charging cycles responsibly, you preserve cell capacity and prevent range drops. Key Takeaway: Never leave your charger plugged in overnight to avoid keeping the cells under high-voltage stress. Charging State Voltage Strain Battery Wear Level Recommended Action Plan 0% to 80% (Bulk) Very Low Minimal wear on cells Ideal daily state for short commutes 80% to 100% (Saturation) High Moderate strain Charge fully, but do not leave connected Connected 24+ Hours Extremely High Accelerated degradation Use an outlet timer to auto-shutoff While charging habits protect internal chemistry, external mechanical factors like tires also dictate how fast your power drains. Can Flat Tires Accelerate Electric Scooter Battery Drain? Yes, riding on under-inflated tires creates massive rolling resistance, which triggers rapid electric scooter battery drain. When your tires lack proper air pressure, the rubber flattens against the pavement, increasing the contact patch. This friction forces your motor to pull twice as much current to maintain […]

Why Is My Electric Scooter Battery Draining So Fast? Read More »

Electric Scooter Tire Pressure for Beginners: Best PSI Guide

The ideal electric scooter tire pressure for beginners is typically between 40 to 50 PSI, as this range offers the perfect balance of speed, comfort, safety, and battery range. Imagine unboxing your brand-new electric scooter, excited for your first ride, only to find yourself struggling to maintain speed while feeling every single bump in the pavement. Riding on incorrectly inflated tires not only ruins your comfort but also risks sudden pinch flats that can leave you stranded. Fortunately, mastering your everyday electric scooter tire pressure is a simple, highly effective solution that immediately restores your ride quality and protects your investment. What is the ideal electric scooter tire pressure? The ideal electric scooter tire pressure is typically between 40 and 50 PSI for most standard commuter models. This range ensures that you achieve optimal battery range, high top speeds, and a comfortable ride. Maintaining this sweet spot will keep your machine running efficiently. Why is 50 PSI the standard benchmark? But here is the catch: dropping even slightly below this standard level can cause your motor to work harder, draining your battery much faster than expected. Keeping your tires at 50 PSI ensures you enjoy a clean, responsive ride every single day. Key Takeaway: Sticking to a standard 50 PSI pressure range maximizes your battery range and protects your wheels from sudden urban road hazards. Tire Pressure Performance Level Comfort Rating Under 35 PSI Sluggish and slow Soft but risky 40 to 50 PSI Highly optimized Excellent balance Over 55 PSI Maximum speed Harsh and bumpy Understanding these optimal benchmarks is just the first step in unlocking your ride’s true potential. Why should you check electric scooter tire pressure? You should check your electric scooter tire pressure regularly because improper inflation can directly cause flat tires, sluggish handling, and accelerated wear on your motor. Over time, air naturally escapes through the rubber of pneumatic tires, leading to a slow and silent performance drop. Ignoring this simple maintenance task can cost you heavy repair bills down the road. How does pressure impact your safety? Want to know the best part? Maintaining the correct air volume ensures that your brakes grip the pavement perfectly, keeping you safe during sudden emergency stops. Key Takeaway: Routine pressure checks ensure your brakes and steering perform flawlessly to keep you safe on every commute. Inflation Level Braking Efficiency Cornering Stability Low Pressure Poor and slow Soft and unpredictable Proper Pressure Excellent and responsive Firm and stable Now that you know why it matters, let us examine how to quickly measure these levels. How do you measure electric scooter tire pressure? You measure electric scooter tire pressure by attaching a digital or analog tire pressure gauge directly to the tire’s valve stem. This process takes less than a minute and gives you a precise reading of the exact air pressure inside your wheels. Which measuring tool should you choose? Think about it: relying on the manual “squeeze test” with your fingers is highly inaccurate and can easily lead to riding on dangerously soft wheels. Key Takeaway: Using a dedicated digital pressure gauge eliminates guesswork and ensures your tires are perfectly inflated for every trip. Tool Type Accuracy Level Convenience Finger Squeeze Extremely Low High Analog Gauge Moderate Moderate Digital Gauge Extremely High High Once you have the proper tools, you must consider how your specific wheel design alters your pressure needs. How does rider weight impact electric scooter tire pressure? Rider weight impacts your electric scooter tire pressure because heavier riders place more downward force on the wheels, requiring higher PSI levels to prevent the tire from bottoming out. If a heavier rider uses the same low pressure as a lighter rider, the tire will sag, slowing down the scooter and exposing the rims to damage. How do you calibrate pressure to your weight? But here is the catch: over-inflating your tires just because of weight can make your ride feel incredibly harsh and reduce your road grip. Key Takeaway: Adjusting your tire pressure based on your exact body weight maintains speed and protects your wheels from bottoming out on potholes. Rider Weight Range Front Tire PSI Rear Tire PSI Under 150 lbs 40 PSI 42 PSI 150 to 220 lbs 45 PSI 48 PSI Over 220 lbs 50 PSI 55 PSI Failing to calibrate your wheels to your weight can lead to the dangerous consequences of low inflation. What happens with low electric scooter tire pressure? Low electric scooter tire pressure causes sluggish acceleration, reduced top speeds, significantly shorter battery range, and a highly unstable, unsafe ride. When your tires are soft, they deform against the asphalt, creating a massive contact patch that increases rolling resistance and forces your motor to work twice as hard. Why are pinch flats your worst enemy? Think about it: riding over a simple curb with low pressure will immediately pinch your inner tube against the metal rim, causing an instant flat. Key Takeaway: Maintaining firm pressure completely eliminates the risk of pinch flats and keeps your battery running at peak efficiency. Pressure State Pinch Flat Risk Battery Range Under-inflated Extremely High Drastically Reduced Fully Inflated Extremely Low Maximum Range While low pressure is a massive headache, inflating your tires too high carries its own set of dangers. Is high electric scooter tire pressure dangerous? Yes, excessively high electric scooter tire pressure is extremely dangerous because it reduces your tire’s contact patch with the road, leading to a severe loss of traction and stability. When tires are over-inflated, they become rock-hard, making your scooter bounce violently over cracks and drastically increasing your braking distance. Can over-inflation cause a tire blowout? Want to know the best part? Staying safely below the maximum PSI printed on the sidewall is the simplest way to prevent a catastrophic blowout. Key Takeaway: Keeping your tire pressure below the maximum limit ensures a safe grip on the road and prevents explosive tire blowouts. PSI Level Road Grip Blowout Risk Safely Inflated Maximum Traction Minimum Risk Over-inflated […]

Electric Scooter Tire Pressure for Beginners: Best PSI Guide Read More »

How to Clean An Electric Scooter: Step-by-Step Guide

Dirty electric scooters break down faster and look terrible. Many owners skip regular cleaning and face expensive repairs later. Proper cleaning extends your scooter’s life and keeps it running smoothly. Electric scooter cleaning requires specific supplies, careful preparation, and safe techniques to avoid electrical damage. Use mild soap, soft brushes, and minimal water around electrical components. Always power off completely and protect charging ports before cleaning. Clean the frame first, then wheels, avoiding pressure washers and harsh chemicals. Dry thoroughly before reassembly and test all functions afterward. Regular cleaning every 2-4 weeks prevents dirt buildup, extends component life, and maintains optimal performance. Proper maintenance during cleaning catches problems early and saves money on repairs. This guide covers safe cleaning methods, required supplies, and maintenance tips to keep your scooter in perfect condition. 1. What Cleaning Supplies Do You Need for Electric Scooters? Having the right cleaning supplies makes scooter maintenance safe and effective. Wrong products can damage electrical components or void your warranty. Here’s the deal… investing in proper cleaning supplies costs less than replacing damaged parts from improper cleaning methods. Essential cleaning tools include soft-bristled brushes, microfiber cloths, and spray bottles for controlled water application. Avoid stiff brushes that scratch surfaces or damage seals. Use different brush sizes for various components. Microfiber cloths clean without scratching and absorb water effectively. Safe cleaning products for electrical components include mild dish soap, specialized electronics cleaners, and distilled water. Harsh chemicals damage plastic, rubber, and metal finishes. Electronics cleaners evaporate quickly and leave no residue. Distilled water prevents mineral deposits that tap water creates. Protective gear includes rubber gloves, safety glasses, and old clothes for messy cleaning tasks. Gloves protect hands from cleaning chemicals and dirty components. Safety glasses prevent splashing chemicals from reaching eyes. Old clothes allow freedom of movement without worry about stains. Specialized brushes and accessories include wheel brushes, detail brushes, and compressed air for hard-to-reach areas. Wheel brushes clean tire treads and brake components effectively. Detail brushes reach small spaces around controls and connections. Compressed air removes debris without water contact. Supply Category Recommended Items Purpose Safety Notes Cleaning Tools Soft brushes, microfiber cloths Surface cleaning Avoid stiff bristles Cleaning Products Mild soap, electronics cleaner Safe component cleaning No harsh chemicals Protective Gear Gloves, safety glasses Personal protection Always wear during cleaning Specialized Tools Detail brushes, compressed air Hard-to-reach areas Use appropriate pressure 2. How Do You Prepare Your Scooter for Safe Cleaning? Proper preparation prevents electrical damage and ensures thorough cleaning access. Skipping preparation steps can cause expensive damage to sensitive components. This is important because… electrical damage from improper cleaning often voids warranties and requires costly repairs. Power-off procedures start with turning off the scooter completely and removing the key if equipped. Check that all lights and displays are off before proceeding. Allow hot components to cool for at least 30 minutes after riding. Hot surfaces can crack when exposed to cold water. Removing detachable parts provides better cleaning access and protects sensitive components. Take off removable fenders, lights, and accessories according to your manual. Store small parts in containers to prevent loss. Label or photograph complex assemblies before disassembly. Protecting electrical components requires covering charging ports, displays, and control panels with plastic bags or tape. Water in electrical connections causes corrosion and failures. Use waterproof tape that removes cleanly without residue. Double-check all electrical areas are protected before starting. Setting up proper workspace includes choosing a shaded area with good drainage and ventilation. Direct sunlight causes cleaning products to dry too quickly and leave streaks. Good drainage prevents water from pooling around electrical components. Adequate ventilation helps components dry faster after cleaning. Preparation Step Time Required Critical Points Common Mistakes Power Off 2 minutes Complete shutdown, cooling time Rushing while components are hot Remove Parts 5-10 minutes Follow manual, organize parts Losing small components Protect Electronics 3-5 minutes Waterproof covering Incomplete protection Setup Workspace 5 minutes Shade, drainage, ventilation Cleaning in direct sun 3. What Is the Best Way to Clean the Scooter Frame and Body? Frame cleaning requires systematic approach to remove dirt without damaging finishes or electrical components. Different materials need specific cleaning methods for best results. Now, you might be wondering… how do you clean effectively while protecting sensitive areas? The answer involves proper technique and patience. Step-by-step frame cleaning starts with rinsing loose dirt with low-pressure water. Work from top to bottom to prevent recontaminating clean areas. Use spray bottles for controlled water application near electrical components. Avoid directing water streams at seals, joints, or electrical connections. Removing dirt and road grime requires gentle scrubbing with soapy water and soft brushes. Mix mild dish soap with warm water in a bucket. Dip brushes in soapy water and scrub in circular motions. Rinse brushes frequently to prevent spreading dirt around surfaces. Cleaning different frame materials safely depends on identifying aluminum, steel, or plastic components. Aluminum frames resist corrosion but scratch easily with abrasive cleaners. Steel frames need thorough drying to prevent rust. Plastic components can crack from harsh chemicals or extreme temperatures. Dealing with stubborn stains requires patience and appropriate products for each stain type. Oil stains respond to degreasing dish soap and warm water. Rust stains need specialized rust removers safe for your frame material. Road salt requires thorough rinsing with distilled water to prevent corrosion. Frame Material Cleaning Method Special Considerations Products to Avoid Aluminum Mild soap, soft brush Scratches easily Abrasive cleaners Steel Soap, immediate drying Rust prevention Extended water exposure Plastic Gentle cleaners Temperature sensitivity Harsh chemicals Painted Surfaces pH-neutral cleaners Finish protection Acidic or basic cleaners 4. How Should You Clean Electric Scooter Wheels and Tires? Wheel and tire cleaning improves performance and extends component life. Dirty wheels affect braking and handling while hiding potential problems. Want to know the secret? clean wheels reveal wear patterns and damage that dirty wheels conceal, helping prevent accidents and costly repairs. Tire cleaning techniques vary by tire type and tread pattern. Solid tires clean easily with soap and water […]

How to Clean An Electric Scooter: Step-by-Step Guide Read More »

What To Do If Your Electric Scooter Handlebar Is Loose?

If your electric scooter handlebar is loose, you must immediately stop riding, park on a flat surface, inspect the stem’s folding mechanism and bolts, and tighten any worn or loose fasteners using an Allen key to restore structural stability. Picture this: you are cruising smoothly on your morning commute when you suddenly feel an unsettling, shaky wobble under your hands. Your heart drops as you realize your steering is no longer responding precisely, leaving you incredibly vulnerable amidst busy city traffic. This sudden panic is exactly what happens when your connection to the road is compromised. Ignoring a loose electric scooter handlebar is a recipe for disaster on any daily ride. What starts as a minor, annoying vibration can rapidly escalate into full mechanical steering failure at high speeds. A sudden collapse of your stem could throw you over the front wheels, leading to serious injury and costly repairs. Fortunately, this definitive step-by-step guide will show you how to easily diagnose, fix, and prevent steering wobble right at home. Is your loose electric scooter handlebar safe to ride? Riding with a loose electric scooter handlebar is highly unsafe because it drastically reduces your steering responsiveness and increases the risk of a catastrophic crash. When your steering column has physical play, your tires cannot react accurately to sudden movements. Even a minor millimeter of slack can amplify dramatically when you travel at speeds over fifteen miles per hour. Therefore, securing this connection immediately is your absolute first priority before resuming any ride. What are the immediate risks of wobbly steering? Think about it: when your controls are unstable, your physical reaction times are severely delayed. If you have to swerve suddenly to avoid an obstacle, a wobbly handlebar can cause you to overcorrect and lose balance. This risk is even higher when navigating wet roads or steep declines. A loose setup also places immense stress on the folding latch, which can snap under sudden pressure. How to perform an emergency road test? Look: before you head out on your next commute, you should perform a quick physical safety check. Stand over your deck, squeeze the front brake, and gently rock the handlebars forward and back. If you feel any play or hear clicking sounds, your stem requires immediate attention. This simple habit keeps you ahead of potential road failures before they happen. Key Takeaway: Never ignore any level of steering instability. A minor wobble is a clear warning sign of loose hardware that can quickly lead to complete structural failure on the road. Risk Level Steering Play (mm) Recommended Action Safe to Ride? Low < 1mm Tighten collar clamp Yes (with caution) Medium 1mm – 5mm Adjust folding latch & stem bolts No High > 5mm Inspect headset bearings / Professional repair Absolutely No The table above categorizes different severities of steering play to help you quickly assess the safety of your ride before commuting. Why is your loose electric scooter handlebar so wobbly? Your handlebar is wobbly because the constant vibrations from daily riding gradually back out the structural screws and loosen the quick-release latch tension. This mechanical degradation accelerates rapidly when you travel over bumpy city streets, brick paths, or gravel roads. These endless micro-impacts slowly break the friction seal of your fasteners. To keep your ride stable, you must address this persistent issue on your loose electric scooter handlebar by restoring proper clamp tension. How riding vibrations loosen hardware Here is the deal: every bump you hit sends a shockwave directly up the steering column. Over time, these microscopic vibrations break the friction bond between your bolts and the metal stem threads. Without preventative maintenance, these fasteners will slowly unwind until the assembly shifts. This natural process can turn a perfectly solid ride into a wobbly safety hazard within a few weeks. What parts wear down over time? But wait, there’s more: it is not just about loose screws; mechanical parts also experience physical wear and tear. Plastic spacer bushings can crack, and metallic folding pins can slowly bend under heavy physical pressure. You must regularly inspect these wear-prone areas to ensure your system remains rigid. Replacing worn bushings is often the cheapest way to restore that tight, brand-new feeling. Key Takeaway: Road vibration is the primary enemy of a secure stem, meaning routine inspections of high-wear parts are essential to stop play before it starts. Wear Component Lifespan (Months) Primary Symptom of Failure Replacement Cost Rubber Dampeners 6 – 12 Soft forward/back handlebar drift Very Low Stem Locking Pin 12 – 24 Sudden popping noises when braking Low Threaded Bolts 12 – 18 Continuous backing out after tightening Very Low Review this component wear guide to understand which parts might need physical replacement rather than simple tightening. How to fix a loose electric scooter handlebar fast? To fix the wobble quickly, you must locate the primary locking collar or stem bolts, realign the handlebars with the front tire, and tighten each fastener in an alternating pattern. Taking care of a loose electric scooter handlebar takes less than ten minutes with the right approach. By applying even pressure across all bolts, you prevent the clamping collar from warping. This simple DIY method restores steering control and makes your daily trips instantly safer. Step-by-step tightening process By the way: you do not need to be a professional mechanic to perform this repair. Start by cleaning any dirt out of the bolt heads so your tools seat fully inside them. Tighten each screw a quarter-turn at a time to ensure even clamping pressure across the stem. This gradual method protects the soft aluminum threads from stripping under heavy torque. How to check correct wheel alignment? Here is why: a secure handlebar is useless if it is pointed five degrees to the left. You should always double-check your alignment by looking straight down the front of the steering column. Adjust the collar clamp position until the grips are perfectly perpendicular to your tire. Taking your time here ensures a comfortable […]

What To Do If Your Electric Scooter Handlebar Is Loose? Read More »

Electric Scooter Laws South Carolina 2026: Rules & Restrictions

In South Carolina, electric scooters occupy a legal gray area at the state level—often treated under Electric Personal Assistive Mobility Device (EPAMD) statutes—but are primarily governed by strict local city ordinances that regulate sidewalk riding, speed limits, parking, and business permits. Picture yourself cruising down a sun-drenched historic street in Charleston, enjoying a breezy morning ride on your way to work. Suddenly, you hear a siren and find yourself being pulled over by an officer, facing an expensive ticket because you rode on a sidewalk where local rules forbid it. Fortunately, understanding electric scooter laws in South Carolina is the key to enjoying your daily commute with absolute confidence and peace of mind. This comprehensive guide demystifies the complex web of statewide statutes and local city codes, giving you a clear, easy-to-follow roadmap. Let’s make sure you stay safe, legal, and fully compliant on every single ride. Is Your Ride Legal in South Carolina? Yes, riding an electric scooter is generally legal in South Carolina, but the exact rules depend heavily on municipal ordinances since state-level rules are built around older technology. Navigating electric scooter laws in South Carolina requires understanding this crucial legal division. While state codes provide a baseline, they leave plenty of room for local municipalities to set their own standards. This dual-layered regulatory system means that what is perfectly legal in one neighborhood could get you stopped in another. Because state laws have not fully caught up to modern stand-up scooters, local towns have taken matters into their own hands. As a rider, staying informed about your local area is your absolute best defense against unexpected citations. How Do State Statutes Define Micromobility? South Carolina’s broad transit codes struggle to place modern electric kick-scooters into a neat classification box. Instead, the state baseline groups low-speed personal vehicles into broad categories of alternative transport. Here is the deal: without a dedicated statewide category for standard stand-up scooters, individual officers and towns are forced to make their own rules. The state mainly recognizes: Why Does South Carolina Focus on EPAMDs? Statewide laws heavily focus on EPAMDs because they were originally designed to regulate Segway-style self-balancing vehicles. To qualify under this classification, a device must possess very specific self-balancing technology. Think about it: most daily stand-up electric scooters don’t actually self-balance on their own. This technical gap is why local governments have to step in and draft customized municipal ordinances. Key Takeaway: Statewide legislation is built around self-balancing devices, leaving standard stand-up scooters in a legal gray area that local municipalities must address. Device Category State Definition Max Power/Speed (State) Local Regulation Allowed? EPAMD Self-balancing, 2 non-tandem wheels 15 mph / Unspecified power Yes, highly encouraged Moped Under 50cc or electric equivalent 30 mph / Under 2 brake HP Yes, subject to traffic codes Stand-Up E-Scooter Not explicitly defined statewide N/A (Defaults to local) Yes, completely local jurisdiction An analysis of state-level classifications reveals a clear gap between vintage statutory language and contemporary scooter designs. How Are Scooter Regulations Decided? Scooter regulations in South Carolina are ultimately decided by a combination of broad state traffic guidelines and highly specific municipal city ordinances. Understanding how electric scooter laws in South Carolina are structured helps riders avoid unexpected legal trouble. Because the state level focuses on older EPAMD classifications, local city councils have complete authority to override or define terms. This means you must know the specific local code of any town you enter. While this decentralized system allows cities to protect their historic streets, it places the responsibility of compliance directly on the rider. Let’s look at how these rules are interpreted in daily life. What Makes Stand-Up Scooters Legally Ambiguous? The legal status of stand-up electric scooters remains fuzzy because they do not utilize the dual non-tandem, self-balancing wheel configuration required of EPAMDs. Because of this, standard personal scooters occupy a legal middle ground. Look at it this way: riding an unclassified device means you might be subjected to erratic law enforcement stops depending on which road you choose. Are We Treating Stand-Up Units as Mopeds? Some local courts and enforcement officers have occasionally attempted to categorize high-powered stand-up scooters under state moped regulations. However, mopeds require formal DMV registration, license plates, and distinct equipment standards. The best part? Personal electric scooters generally escape these restrictive requirements because their motor power falls well below typical moped thresholds. Key Takeaway: Never assume a standard stand-up scooter is legally identical to an EPAMD; always check local definitions first to avoid misclassification citations. Classification Route Primary Legal Risk Operational Impact Recommended Action EPAMD Fallback Lack of self-balancing design Unintended traffic violations Keep speed governed below 15 mph Moped Fallback Stricter registration rules Equipment & licensing issues Verify with local DMV offices Determining the correct vehicle class requires analyzing both design specs and local interpretation frameworks. Should You Ride on Sidewalks or Roads? You should ride your electric scooter on public roadways or designated bike lanes, as sidewalk riding is strictly banned in most major South Carolina business districts. Knowing how electric scooter laws in South Carolina treat different riding surfaces keeps both you and pedestrians safe. While state rules technically allow EPAMDs on sidewalks, cities heavily restrict riding on pedestrian paths to prevent accidents. Choosing a lightweight electric scooter makes transitioning between roadways and bike paths incredibly seamless. This flexibility allows you to adapt instantly to local sidewalk restrictions without breaking a sweat. Can You Ride Your Scooter on the Sidewalk? Riding on the sidewalk is heavily regulated and often banned in commercial city centers like downtown Charleston or Columbia. This is done to prevent high-speed collisions with shoppers and tourists walking on narrow pathways. Think about it: sidewalks are designed first and foremost for pedestrians, making any fast motorized device a major hazard. What Are the Rules for Riding on Roadways? When you take your electric scooter onto public roads, you are generally required to ride as far to the right side of the lane as possible. You must obey […]

Electric Scooter Laws South Carolina 2026: Rules & Restrictions Read More »

Why Your Electric Scooter Shuts Off While Riding: Causes & Fixes

An electric scooter typically shuts off while riding due to a protective cutoff triggered by battery overheating, loose wiring connections, or an overloaded motor controller. Picture this: you are gliding smoothly down a busy street, keeping pace with traffic, when suddenly your motor dies and your display screen goes completely black. Getting stranded in the middle of a chaotic intersection is not only incredibly frustrating, but it also poses a serious safety risk as vehicles try to navigate around you. Fortunately, you do not need to be a professional mechanic to fix this issue; simple home-based troubleshooting can resolve most connection and battery bugs. If you are struggling with a sudden electric scooter shutdown while riding, this comprehensive diagnostic guide will help you pinpoint the issue and get back to your daily commute quickly. Why does electric scooter shutdown while riding? An electric scooter suddenly powers off during a trip due to system-protective measures like battery overheating, loose wire connections, or electrical overcurrent. When these safety thresholds are breached, the internal management system cuts the flow of power to prevent critical hardware damage. Understanding why you experience an electric scooter shutdown while riding is the first step toward getting back on the road safely. Troubleshooting Common Culprits Here is the deal: Most sudden power cuts can be traced back to a handful of electrical or mechanical safeguards inside your vehicle. By knowing exactly where to look, you can save hours of troubleshooting and avoid costly mechanic bills. Key Takeaway: Identifying the core cause of your scooter’s power failure empowers you to resolve minor mechanical issues at home. This proactive approach ensures your daily commutes remain uninterrupted and completely safe. Component Failure Mode Fix Battery Pack Overheating / Sag Cool down or balance cells Controller Overcurrent reset Smooth throttle modulation Wiring Loose terminal plugs Secure with electrical tape Analyzing these distinct components helps you narrow down whether your power failure stems from thermal defense or a physical connection break. Can a hot battery cause electric scooter shutdown while riding? Yes, an overheated battery pack will trigger a safety shutdown to prevent dangerous thermal runaway and permanent cell degradation. When internal temperatures exceed safe operating limits, the protective circuitry cuts off the power supply immediately. Experiencing an electric scooter shutdown while riding on an exceptionally hot summer afternoon is a clear indicator that your battery needs to cool down. Managing High Battery Temperatures Think about it: Lithium-ion battery packs are highly sensitive to thermal spikes caused by extreme weather or aggressive riding. Allowing the cells to cool down completely before recharging or restarting is vital for preserving the system’s integrity. Key Takeaway: Allowing your battery pack to cool down naturally prevents severe damage to the individual lithium-ion cells. This simple habit keeps your power output steady and extends the overall lifespan of your machine. Component Failure Mode Fix Battery Cells Thermal overload Rest the scooter in shade Temp Sensor False thermal read Replace faulty thermistor Keeping an eye on your deck’s temperature during hot summer days helps intercept thermal shutdowns before they strand you. Does water trigger electric scooter shutdown while riding? Yes, water ingress into the deck or handlebars can cause short circuits that immediately shut down the motor. Moisture acts as a conductive bridge between electrical contacts, triggering the system’s safety circuit to cut off power to prevent permanent damage. If moisture penetrates your electrical seals, a sudden electric scooter shutdown while riding will occur to protect the electronics. Preventing Moisture Damage The best part? You can easily prevent water damage by adding extra silicone sealant around your deck seams and cable entry ports. Ensuring that your vehicle is rated for wet-weather riding will keep you safe during sudden downpours. Key Takeaway: Protecting your scooter’s delicate electronics from water ingress stops corrosion and sudden short circuits. Taking active waterproofing steps guarantees reliable performance during damp morning commutes. Component Failure Mode Fix Charging Port Water ingress Dry completely and seal cover Deck Seams Gasket failure Apply clear silicone sealant Vigilant waterproofing acts as your primary shield against unpredictable weather and sudden moisture-induced cutouts. Will loose wires lead to electric scooter shutdown while riding? Yes, loose wiring connections will instantly break the electrical circuit when your vehicle experiences sudden road vibrations or bumps. Constant rattling from uneven pavement weakens soldered points and plastic connectors inside the steering column and deck. Over time, these unstable terminals will spark a sudden electric scooter shutdown while riding and leave you without any display power. Securing Loose Terminal Connections Look at it this way: Even a microscopic gap in a main power wire can stop the flow of electricity to your motor. Opening the deck to inspect and secure loose connection blocks is a highly effective weekend maintenance project. Key Takeaway: Regularly checking and securing your internal wiring harnesses prevents connection breaks on rough roads. This simple check gives you peace of mind when navigating bumpy urban routes. Component Failure Mode Fix Main Harness Plug disconnection Re-seat and wrap with electrical tape Phase Wires Solder joint crack Re-solder loose wire terminals Securing your internal connections ensures that physical road impacts do not disrupt your scooter’s continuous electrical flow. Is overload behind electric scooter shutdown while riding? Yes, carrying too much weight or climbing excessively steep hills will overload the system and cause an immediate power cutoff. When you force the motor to work beyond its design limitations, it draws a massive amount of current that triggers the battery protective shutdown. If you exceed the maximum payload capacity, you will likely experience a safety-oriented electric scooter shutdown while riding to protect the motor from burning out. Managing Load and Incline Strain Here is the deal: Every motor has a specific current draw limit that must not be exceeded for long periods. Reducing the payload and assisting the scooter on steep hills prevents severe electrical strain on the battery. Key Takeaway: Operating your scooter within its rated weight and hill-climbing limits prevents the system from drawing destructive […]

Why Your Electric Scooter Shuts Off While Riding: Causes & Fixes Read More »

Why Is My Electric Scooter Going Slow? Common Causes & Fixes

Slow electric scooters frustrate riders and waste time. Many speed problems have simple fixes that owners can handle themselves. Understanding the causes helps you get back to full speed quickly. Electric scooters go slow due to battery problems, motor issues, mechanical friction, excess weight, and environmental factors. Low battery charge reduces power delivery and activates speed limiters. Worn motors, brake drag, low tire pressure, and heavy loads all decrease performance. Cold weather reduces battery efficiency while hills demand more power. Most speed problems stem from poor maintenance, aging components, or improper use. This guide covers the main causes of slow speeds and practical solutions to restore your scooter’s performance. 1. What Battery Problems Cause Slow Electric Scooter Performance? Battery issues are the most common cause of slow electric scooter performance. Most speed problems start with power delivery issues from the battery system. Here’s the deal… your scooter’s speed depends directly on how much power the battery can deliver to the motor. Low battery charge reduces available voltage and triggers speed-limiting protection systems. Most scooters slow down when battery charge drops below 50%. Voltage sag under load causes further speed reduction. The battery management system limits power to prevent damage. Battery age and capacity degradation affect performance even when fully charged. Old batteries cannot deliver peak power like new ones. Capacity loss means less energy storage and shorter range. Internal resistance increases with age, reducing power delivery efficiency. Faulty battery cells create voltage imbalances that limit overall pack performance. One weak cell drags down the entire battery pack. Damaged cells cannot hold charge or deliver power properly. Cell failures often cause sudden speed drops during rides. Temperature effects significantly impact battery performance and scooter speed. Cold batteries deliver less power and have reduced capacity. Hot batteries may trigger thermal protection that limits performance. Extreme temperatures can cause permanent battery damage. Battery Problem Speed Impact Warning Signs Solution Low Charge Gradual slowdown Battery indicator, reduced range Charge battery fully Age Degradation Consistent slow performance Shorter range, slow charging Replace battery pack Faulty Cells Sudden speed drops Voltage warnings, uneven charging Professional battery service Temperature Issues Variable performance Weather-related speed changes Temperature management 2. How Do Motor Issues Affect Electric Scooter Speed? Motor problems directly impact your scooter’s ability to convert electrical power into motion. Even minor motor issues can cause significant speed reductions. This is important because… motor problems often worsen quickly and can cause complete failures if ignored. Motor wear creates internal friction that reduces efficiency and speed. Brushed motors wear out faster than brushless designs. Worn brushes create poor electrical contact and reduced power. Internal components may develop play or misalignment over time. Overheating triggers thermal protection systems that limit motor power to prevent damage. Heavy use, high ambient temperatures, and poor ventilation cause overheating. Thermal sensors reduce power when temperatures exceed safe limits. Continued overheating can cause permanent motor damage. Electrical connection issues prevent proper power delivery to the motor. Loose connections create resistance and voltage drops. Corroded terminals reduce electrical conductivity. Damaged wiring can cause intermittent power delivery problems. Controller malfunctions affect how power flows from battery to motor. The controller regulates motor speed and torque delivery. Faulty controllers may limit power or provide inconsistent performance. Programming errors can cause speed restrictions or poor acceleration. Motor Issue Performance Effect Diagnosis Method Repair Complexity Wear and Friction Gradual speed loss Listen for unusual noises Professional service required Overheating Sudden power reduction Feel motor temperature Improve ventilation, reduce load Connection Problems Intermittent speed issues Check connections visually DIY repair possible Controller Faults Erratic performance Professional diagnostics Professional service required 3. What Mechanical Problems Slow Down Electric Scooters? Mechanical friction and alignment issues rob power from your scooter’s motor. Small mechanical problems can cause surprisingly large speed reductions. Now, you might be wondering… how much difference can mechanical issues really make? The answer is often 20-30% speed reduction from seemingly minor problems. Tire pressure affects rolling resistance and overall scooter performance significantly. Under-inflated tires increase rolling resistance and reduce speed. Low pressure also increases tire wear and reduces range. Proper pressure improves efficiency and extends tire life. Brake drag occurs when brakes do not fully release after use. Dragging brakes create constant friction that slows the scooter. Brake cable tension, pad alignment, and hydraulic issues cause drag. Even slight brake contact reduces speed and wastes battery power. Chain or belt tension affects power transfer efficiency from motor to wheels. Loose chains skip and waste power during acceleration. Tight chains create excessive friction and wear. Belt drives need proper tension for optimal power transfer and longevity. Bearing friction in wheels, steering, and folding mechanisms reduces efficiency. Dirty or worn bearings increase rolling resistance. Lack of lubrication causes bearings to bind and create drag. Regular bearing maintenance prevents friction-related speed loss. Mechanical Problem Speed Loss Easy Check Method Maintenance Frequency Low Tire Pressure 15-25% Pressure gauge check Weekly Brake Drag 10-20% Spin wheel freely Monthly Chain/Belt Issues 5-15% Visual inspection Monthly Bearing Friction 5-10% Feel for smooth rotation Quarterly 4. How Does Rider Weight and Load Impact Scooter Speed? Weight significantly affects electric scooter performance, especially on hills and during acceleration. Most riders underestimate how much weight impacts their scooter’s speed. Want to know the secret? staying within weight limits and reducing unnecessary cargo can dramatically improve performance. Weight limits exist for safety and performance reasons. Exceeding limits stresses the motor, battery, and mechanical components. Heavy loads require more power to achieve the same speeds. Manufacturers design scooters for specific weight ranges to optimize performance. Cargo and passenger weight effects are cumulative and impact all aspects of performance. Extra weight reduces acceleration, top speed, and range. Hills become more challenging with heavy loads. Braking distances increase with additional weight. Hill climbing performance suffers dramatically with excess weight. Motors work harder to overcome gravity and weight. Battery drain increases significantly on inclines with heavy loads. Some scooters may not climb hills at all when overloaded. Acceleration differences become obvious with varying weights. Heavy […]

Why Is My Electric Scooter Going Slow? Common Causes & Fixes Read More »

How to Start a Electric Scooter Without a Kickstart: Complete Guide

To start an electric scooter without a kickstart, you simply need to configure your handlebar dashboard’s program settings (known as P-settings) to activate Zero-Start mode, allowing the motor to engage directly from a complete standstill when you press the throttle. This direct-start method bypasses the standard requirement of manual physical kicking to launch the scooter. Imagine waking up late, rushing out the door, and realizing you have only fifteen minutes to cross town for a crucial morning meeting. You hop onto your commuter ride, push off frantically against the cold pavement, and feel that sudden spike of frustration as you struggle to gain enough physical momentum to get the motor to kick in. This tiring, low-tech hassle is the last thing you need when every second counts, and it can leave you feeling exhausted before your workday even begins. Fortunately, our complete guide will show you how to completely eliminate this exhausting manual start process. Learning how to operate an electric scooter without a kickstart will revolutionize your daily travel experience by providing instant torque with zero physical effort. Let’s dive deep into how you can configure, manage, and safely enjoy this ultimate urban mobility upgrade. Why ride an electric scooter without a kickstart? Riding an electric scooter without a kickstart provides immediate throttle response directly from a complete standstill. This instant acceleration eliminates the physical strain of kicking off, making your daily journeys remarkably smooth. If you are looking to enjoy this seamless riding experience, choosing a premium electric scooter without a kickstart will transform how you handle heavy city traffic. It is the ultimate convenience upgrade for modern urbanites who value speed and comfort. What is Zero-Start technology? Here is the deal: zero-start technology is an advanced feature that allows your motor to engage the exact moment you touch the throttle. Unlike traditional kick-to-start models, there is absolutely no need to manually push off with your foot to reach a minimum speed threshold. This makes it incredibly easy to start riding on steep inclines or when carrying heavy backpacks. It provides a level of modern convenience that feels like stepping directly into the future. How does zero-start compare to kick-start? Think about it: choosing between zero-start and kick-start is all about balancing speed with physical safety. While zero-start engages the motor instantly, kick-start models require you to reach a manual speed of about two miles per hour before the throttle works. This mechanical buffer acts as a built-in safety net. This means you can choose the launch style that best matches your daily commuting environment. Key Takeaway: Zero-start technology eliminates manual pushing, providing an effortless, instant launch that is ideal for effortless city commuting and steep hills. Let’s evaluate how these two starting modes compare to help you decide which style suits your daily commute best. Start Mode Initial Effort Safety Buffer Battery Strain Zero-Start Mode None (Immediate) Moderate (Sensitive throttle) High (Peak current draw) Kick-Start Mode Manual Kick Needed High (Bypasses accidental starts) Minimal (Motor starts under load) How to configure an electric scooter without a kickstart? You configure an electric scooter without a kickstart by adjusting the firmware configuration—specifically turning on the Zero-Start or Non-Kickstart function in the internal program menu. This digital adjustment modifies the controller settings so that pressing the hand throttle instantly powers the motor from a stationary position. Operating your vehicle without a manual kickstart is simple once you access these advanced system control screens. How do you access P-settings? Look: accessing your scooter’s internal P-settings is the secret key to unlocking zero-start capability. These program settings are built into your handlebar display and let you customize speed limits, braking power, and starting modes. By holding down specific button combinations, you enter a configuration menu where P09 or similar settings control the kickstart toggle. It only takes a couple of minutes to set up your ride exactly how you want it. What do P09 parameter settings control? But wait, there’s more: the P09 parameter is the standard industry code used to toggle your startup method. Adjusting this code modifies the controller’s safety check sequence directly. This simple programming step lets you bypass manual physical kickoff entirely. Key Takeaway: Adjusting your handlebar display’s P-settings is a quick, one-time setup that unlocks immediate motor start capability. Properly saving your P-setting adjustments ensures consistent and hassle-free performance. Common P-Setting Default Mode Modified Value Action Result P09 Configuration 1 (Kick-to-Start) 0 (Zero-Start) Direct throttle engagement P12 Configuration Medium Torque High Torque Faster initial acceleration Who benefits from an electric scooter without a kickstart? Modern commuters, elderly riders, and anyone with limited mobility benefit most from an electric scooter without a kickstart because it does not require strenuous manual kicking. Getting up to speed instantly saves crucial physical energy on hot summer days. By utilizing an electric scooter without a kickstart, riders can confidently navigate stop-and-go city streets without breaking a sweat. It streamlines your travel into a highly enjoyable, sweat-free journey. Is this configuration ideal for commuting? Let’s face it: navigating crowded pedestrian crossings and traffic lights is exhausting when you constantly have to kick-start your ride. Commuters face continuous stops and starts that can quickly tire out legs on long routes. This configuration lets you glide forward effortlessly without constantly searching for stable footing. It elevates your morning ride into a highly enjoyable, sweat-free journey. Who benefits from adaptive mobility options? Truth is: physical kick-starting can be a massive barrier for individuals recovering from joint injuries or managing long-term mobility issues. Having access to a vehicle that powers itself instantly means anyone can enjoy the freedom of electric transit. This adaptive design opens up eco-friendly transportation to a wider audience. Key Takeaway: Eliminating manual kickoff dramatically reduces fatigue, transforming stop-and-go commuting into a highly comfortable and stable experience. Switching to direct start options enhances overall ride control and physical comfort in dense urban landscapes. Commute Challenge Kickstart Experience Zero-Start Experience Traffic Light Stops Tedious kicking to restart Instant smooth takeoff Physical Fatigue High leg […]

How to Start a Electric Scooter Without a Kickstart: Complete Guide Read More »

Shopping Cart
Scroll to Top