...

May 2025

How to fold your electric scooter: A step-by-step guide

Ever struggled with a bulky scooter on public transport? Folding it incorrectly can damage the mechanism or cause accidents. Learn the proper technique to protect your investment and ensure safety. To fold your electric scooter properly, first power it off completely, locate the folding mechanism (usually near the stem base), release any safety locks, then gently lower the handlebar stem toward the deck in a controlled motion until it clicks into place. Always secure the folded position before carrying. Folding your electric scooter properly is essential for transportation, storage, and maintenance. Ready to become a folding expert? Let’s dive into why this skill matters so much. Why is folding your electric scooter important? Folding your electric scooter offers many benefits beyond simple convenience. The most obvious benefit is saving space. A folded electric scooter takes up much less room than when extended. This makes storage easier, whether in your apartment, office, or garage. What’s the real story? Many riders store their folded scooters under desks, in closets, or even in small car trunks. Protection from theft is another key advantage. When your scooter is folded, you can bring it indoors rather than leaving it locked outside where thieves might target it. Weather protection is equally important. Leaving your scooter outside exposes it to rain, snow, and extreme temperatures that can damage electronic components. For commuters who use multiple transportation methods, folding capability is essential. If your journey includes bus, train, or rideshare travel, a folded scooter can be carried onboard. Benefit Description Impact Space Efficiency Reduces size by up to 70% Easier storage at home and work Theft Prevention Allows indoor storage Reduces theft risk by 90% Weather Protection Prevents exposure to elements Extends component life Multi-modal Travel Enables combined transportation Increases commuting flexibility What should you know before folding your electric scooter? Before folding your electric scooter, consider several important factors. First, learn about the different folding mechanisms used in electric scooters. These vary between models and brands. Some scooters use quick-release levers for rapid folding with minimal effort. Others use push-button mechanisms that require pressing a specific button before folding. There are also twist-and-fold designs where you rotate a component to unlock the folding capability. But here’s the kicker: some premium models feature unique systems that combine elements of these basic types with additional security features. Safety precautions are essential before folding. Always ensure your scooter is completely powered off. This prevents electrical issues and accidental acceleration during folding. Perhaps the most important preparation step is checking your owner’s manual. Each scooter model has specific folding instructions from the manufacturer. Following these instructions precisely prevents damage to the folding mechanism and keeps your warranty valid. What are the common folding mechanisms in electric scooters? Understanding the various folding mechanisms helps you identify which type your model uses and how to operate it correctly. Quick-release lever systems are among the most common. These systems feature a clamping lever, usually near the stem base, that when released, allows the handlebars to fold down toward the deck. The main advantage is speed and simplicity—most riders can fold their scooter in under five seconds once familiar with the process. Push-button folding mechanisms require pressing a specific button or trigger to unlock the folding capability. These systems often provide additional security, as they can’t be accidentally unlocked by bumping the scooter. Twist-and-fold designs involve rotating a collar or ring to disengage the locking mechanism before folding. This design often provides a more secure lock when unfolded, as the twisting motion is less likely to occur accidentally during riding. Mechanism Type Folding Time Security Level Durability Maintenance Needs Quick-release Lever 3-5 seconds Moderate High Regular tension checks Push-button 5-8 seconds High Moderate Button cleaning Twist-and-fold 8-10 seconds Very High Very High Minimal Proprietary Systems Varies Typically High Varies Follow manufacturer schedule How do you prepare your electric scooter for folding? Proper preparation before folding your electric scooter is crucial for both safety and longevity. The first and most critical step is to power off your scooter completely. This might seem obvious, but many riders overlook it when in a hurry. Powering down prevents electrical issues during folding and eliminates the risk of accidental throttle engagement. Ready for the good part? Some advanced models like the Dynamic Scooter Model B have additional safety features that automatically cut power when folding begins. Finding a clean, flat surface for folding is essential. Trying to fold your scooter on uneven ground can cause you to lose balance or apply uneven pressure to the folding mechanism. Before folding, remove any accessories or attachments that might obstruct the process. This includes aftermarket lights, phone holders, or bags attached to the handlebars or stem. A crucial but often neglected step is checking for obstructions in the folding mechanism. Dirt, small stones, or debris can become lodged in the folding joint, preventing proper operation. Preparation Step Purpose Common Mistakes to Avoid Power off completely Prevents electrical accidents Forgetting to check display is fully off Find flat, clean surface Ensures stability during folding Folding on uneven or dirty surfaces Remove accessories Prevents damage and obstruction Leaving phone holders or bags attached Check for debris Prevents mechanism damage Skipping visual inspection of folding joints What is the step-by-step process to fold a standard electric scooter? While specific folding procedures vary between models, most standard electric scooters follow a similar sequence. The first step is unlocking the folding mechanism. For lever-based systems, this typically involves flipping a clamp or lever located near the stem base. Push-button systems require pressing and holding a specific button, usually until you hear a click indicating the internal lock has disengaged. But here’s the kicker: some scooters require a combination of actions, such as pressing a button while simultaneously pulling a lever. Proper hand positioning is crucial for safe folding. Place one hand on the handlebars for control and the other on the stem near the folding mechanism. This gives you leverage and prevents the scooter from dropping suddenly

How to fold your electric scooter: A step-by-step guide Read More »

How to Fix E7 Error on Electric Scooters: Complete Troubleshooting Guide

Electric scooters have become important tools for modern city commuting. But when your scooter shows an E7 error code, this convenience can suddenly stop. This problem confuses and frustrates many users. Have you ever prepared to leave home, only to find your electric scooter showing an E7 error and refusing to start? This situation is not only annoying but also disrupts your entire schedule. The E7 error on electric scooters typically indicates a Hall sensor problem in the motor. This comprehensive guide walks you through diagnosis and repair, from simple connection checks to sensor replacement. Follow our step-by-step solutions to get your scooter running again without professional help. This guide will help you understand the causes of E7 errors and provide detailed troubleshooting steps. Whether you are a technical beginner or an experienced user, the solutions here will help you quickly restore your scooter to normal use. What is an E7 Error? The E7 error is a common fault code reported by electric scooter control systems. This code usually indicates a problem with the motor Hall sensor. The Hall sensor is a key component in electric scooters, responsible for monitoring the motor’s speed and position, ensuring smooth operation. When this sensor fails, the control system cannot accurately obtain motor status information, so it displays an E7 error and stops working to prevent further damage. In high-end models, the E7 error specifically indicates a problem with the motor sensor circuit. This may be caused by various reasons, from simple loose connections to damage to the sensor itself. The Hall sensor works based on the Hall effect, which detects magnetic field changes and converts them into electrical signals. In electric scooters, these sensors are usually installed inside the motor to detect the position of the rotor. Common Causes of E7 Errors Understanding the possible causes of E7 errors is the first step to solving the problem. Here are some of the most common situations that cause E7 errors: 1. Loose or Damaged Motor Connection Wires The connection wires between the motor and controller may become loose or damaged due to long-term use or accidental collisions. This is one of the most common causes of E7 errors, and also the easiest to check and fix. Connection problems usually appear as intermittent faults, meaning the scooter sometimes works normally and sometimes shows E7 errors. This is because loose connections may temporarily restore contact during vibration or in specific positions. Case: Mr. Li’s scooter worked normally on flat surfaces, but would show an E7 error whenever passing over bumpy sections. After inspection, it was found that one of the motor connection terminals was loose, and contact would be interrupted whenever the scooter experienced significant vibration. After re-securing the terminal, the problem was solved. 2. Hall Sensor Failure The Hall sensor itself may fail due to long-term use, moisture, or manufacturing defects. This situation usually requires replacing the sensor or the entire motor assembly. Sensor failures usually appear as persistent problems, meaning the E7 error appears regardless of conditions. Once a sensor is damaged, it cannot correctly detect the motor rotor position, and the controller cannot correctly control motor operation. 3. Controller Problems Sometimes the problem is not with the motor or sensor, but with the controller. Internal circuit problems in the controller may prevent it from correctly reading Hall sensor signals, triggering E7 errors. Controller problems are usually more complex and may involve multiple components on the circuit board. Common controller problems include broken solder joints, aging capacitors, or moisture on the circuit board. Case: After using her scooter on a rainy day, Ms. Wang began to see E7 errors. Upon inspection, the motor and connections had no problems, but there were slight signs of moisture in the controller. After professional drying and cleaning, the controller resumed normal function, and the E7 error disappeared. 4. Unstable Battery Voltage Unstable or low battery voltage can also cause E7 errors. When the battery cannot provide enough power, the motor and sensors may not work properly. Battery problems usually appear as E7 errors more likely to occur when the battery is low, or in high-load situations (such as going uphill). This is because aging batteries cannot provide enough current to support normal motor operation. 5. Software or Firmware Issues In some cases, the scooter’s software or firmware may have bugs that cause the system to incorrectly report E7 faults. This situation can usually be resolved by resetting the system or updating the firmware. Software problems usually appear as irregular errors, sometimes even temporarily disappearing after shutdown and restart. These problems are more common in new models or scooters that have recently undergone firmware updates. How to Diagnose E7 Errors Before attempting to fix an E7 error, it’s important to correctly diagnose the specific cause of the problem. Here are some effective diagnostic steps: Check the Error Display Pattern First, note the display pattern of the E7 error. Is it continuously displayed or flashing? What is the frequency of flashing? Different display patterns may indicate different types of problems. Most electric scooters use LED displays or dedicated error indicator lights to show error codes. Typically, E7 errors will be displayed with specific flashing patterns, such as flashing 7 times in a row, then pausing, then repeating this pattern. Observe When the Fault Occurs Record the specific circumstances when the E7 error appears. Does it appear immediately at startup, or after riding for a while? Is it more likely to appear under specific environmental conditions, such as humid weather or high temperatures? Create a simple fault log, recording the time, environmental conditions, and usage situation each time the E7 error appears. Such records can help identify patterns, such as whether the error only appears at specific temperatures, or whether it’s related to battery level. Check for External Damage Carefully check if the scooter has signs of external damage, especially in the motor area and connection wires. Sometimes, seemingly minor damage can cause problems with internal components. Pay special attention

How to Fix E7 Error on Electric Scooters: Complete Troubleshooting Guide Read More »

How Old to Ride an Electric Scooter? Age Limits & Rules in 2026

Electric scooters are now very popular. They help people move around cities easily. But many people ask: how old do you have to be to ride an electric scooter? Electric scooter age requirements in North America are generally consistent: most U.S. states and Canadian provinces require riders to be 16+ years old. Some regions mandate helmet use for minors, and riding areas are typically limited to bike lanes and streets. Always check local regulations as they may vary by city. This is about safety and following the law. This article will tell you about age limits in different places, safety issues, and tips for riders of all ages. 1. How Old Do You Need to Be to Ride an Electric Scooter? The age to ride an electric scooter is not the same everywhere. Why is it different? It depends on local traffic laws, city size, bike lanes, and how people think about small vehicles. In Canada, each province or city makes its own rules. In Ontario, you must be 16 or older to ride on public roads. You must wear a helmet if you are under 18. British Columbia also says riders must be 16. In the United States, there is no national law about rider age. In California, you must be 16 and have a driver’s license or permit. In Florida, you can ride at age 16, often without a driver’s license. These age limits are about safety. Officials think about if young people can handle the scooter’s speed and weight, understand traffic, react quickly, and make good choices. Age Limits for E-Scooter Riding: International Comparison Country/Region Typical Minimum Age Key Considerations Canada (Varies) 16-18+ Provincial/Municipal Bylaws, Pilot Programs, Helmets USA (Varies) 16-18+ State/City Laws, Driver’s License Requirements Vary UK 18+ (Rentals Only) Illegal on public roads (private use), Trials ongoing Germany 14+ Specific speed/power limits, Bike lane usage France 12+ Speed limits, Helmet recommended (mandatory <12) List of E-Scooter Regulations in Major U.S. Regions Region Minimum Riding Age Helmet Requirements Other Key Regulations West (California) 16+ Required under 18 No sidewalk riding, max speed 25mph West (Washington) 16+ Recommended for all Allowed on bike lanes and low-speed roads Midwest (Illinois) 16+ Recommended but not mandatory Chicago allows bike lane riding, no sidewalks Midwest (Michigan) 12+ Recommended but not mandatory Max speed 25mph, some sidewalk riding allowed Northeast (New York) 16+ Required under 18 NYC bans e-scooters in Manhattan Southeast (Florida) 16+ Required under 16 Allowed on bike lanes and some roads South (Texas) 16+ Recommended but not mandatory Rules vary by city, Austin and Dallas more lenient Please note that these regulations may change, and city-level rules may differ from state regulations. Before riding, it’s best to check the latest local rules. This is especially important when traveling or using e-scooters across different states. For Dynamic Scooter users, we recommend paying attention to the age restrictions and safety requirements in your area when purchasing and using our products to ensure a legal and safe riding experience. 2. Why Are There Age Restrictions for Electric Scooters? Age limits for electric scooters exist for real safety reasons. So, what are these main reasons? First is body control and reaction time. Riding an electric scooter at speeds up to 25 kph (15 mph) needs good balance, quick reflexes, and fast adjustments. Young children are still growing these skills. Second is knowing traffic rules. Riding on roads means knowing who goes first, what signs mean, and how to share the road. Young riders may not understand these rules well or know what happens if they break them. Risk judgment is another big factor. Teens have brains that are still growing – the part that plans, controls impulses, and judges risks. This can make them take more risks. Think about it: one bad choice can cause a crash. Last, accident reports show why age limits help. Studies show more injuries among younger riders. Age limits try to protect the groups most likely to get hurt. 3. Do Age Requirements Differ for Various Electric Scooter Types? While general age rules exist, the type of scooter can change what’s recommended. Can a 12-year-old ride any scooter if the law allows? Not really. Slow electric scooters for young riders usually go 10-15 kph (6-10 mph). Makers might say ages 8-10 can use these, but only on private property with adults watching. Medium-speed scooters are for commuters and go 20-25 kph (12-15 mph). These usually need riders to be 16+ or 18+. The Dynamic Scooter Model B is this type, with good speed, range, and a design you can fold. High-speed scooters can go over 40 kph (25 mph). These are almost always for adults only, with age limits of 18+ strictly enforced. Foldable scooters, like those from Dynamic Scooter, are great for trips that use trains or buses too. But being easy to carry doesn’t make them good for young riders on public roads. E-Scooter Type vs. General Age Suitability Scooter Type Typical Top Speed General Age Suitability (Guideline Only) Kids’ E-Scooter < 15 kph (< 10 mph) 8+ (Private Property, Supervision) Low-Speed Commuter 15-20 kph (10-12 mph) 14-16+ (Check Local Laws) Mid-Speed Commuter 20-25 kph (12-15 mph) 16-18+ (Check Local Laws) High-Performance > 25 kph (> 15 mph) 18+ 4. How Can Minors Ride Electric Scooters Safely? Even where young people can legally ride electric scooters, safety must come first. How can parents help kids ride safely? Safety gear is a must. A helmet that fits right is the most important thing. Think about knee pads, elbow pads, and wrist guards for beginners. Bright clothes help others see you. Parents should watch and ride with young riders. This lets you guide them and step in if needed. Start in safe places like empty parking lots or quiet streets. Move to busier areas only when they show they can handle it. Safety training should come before riding alone. Teach basic controls: smooth starting, good stopping, and steady turning. Practice emergency stops and going around objects.

How Old to Ride an Electric Scooter? Age Limits & Rules in 2026 Read More »

How Long Does It Take to Charge an Electric Scooter? Quick Guide (2026)

No power in your scooter? Breaking down on the road wastes time and can be unsafe. Understanding how long it takes to charge an electric scooter is essential for anyone using this convenient transport mode. Electric scooters take 3-12 hours to charge. This depends on battery size and charger type. This guide explains key factors and offers tips to improve charging speed. Want to know how to charge faster without harming the battery? How to extend battery life? Keep reading for answers. 1. How Long Does an Electric Scooter Take to Charge? Most electric scooters require 3-12 hours for a full charge, depending on several factors. Let’s get straight to it. Different Brand Charging Times ● Entry-level scooters with smaller batteries typically charge in 3-5 hours, while high-performance models with larger batteries may need 8-12 hours. Dynamic Scooter’s Model B strikes a balance, charging fully in about 4-5 hours with its standard charger, making it practical for daily commuters. Main Factors Influencing Charge Time ● Battery capacity (measured in Ah or Wh) is crucial – larger capacity means longer charging time. Charger power (in Watts) directly affects speed – higher power delivers energy faster. Current battery level and health also matter – charging from empty takes longer, and older batteries charge less efficiently. Dynamic Scooter Charging Advantage ● The Model B features an advanced Battery Management System that optimizes charging, making it approximately 20% faster than comparable scooters. Here’s the real kicker: its removable battery design allows users to purchase a spare, eliminating downtime completely – use one battery while charging another. Scooter Category Battery Type Typical Capacity Standard Charge Time Notes Dynamic Scooter Model B Li-ion Medium 4-5 hours Removable battery, optimized BMS Entry-Level Commuter Li-ion Small 3-5 hours Basic features Mid-Range Commuter Li-ion Medium 5-8 hours Balanced performance High-Performance Li-ion Large 8-12+ hours Extended range Older Models Lead-Acid Medium 6-12 hours Older technology Seasonal changes also impact charging. Cold temperatures can add 1-2 hours to charging time, while the optimal range (15-25°C) ensures maximum efficiency. 2. How Does Battery Capacity Affect Charging Time? Battery capacity significantly determines charging duration. It’s a straightforward relationship, mostly. Common Electric Scooter Battery Capacities ● Entry-level scooters feature 4-6Ah batteries, mainstream commuters like Dynamic Scooter Model B typically have 5-15Ah, while high-performance models can reach 30Ah or more. Larger capacity means longer range but also longer charging time. Relationship Between Capacity and Charge Time ● The relationship is generally linear – double the capacity roughly doubles charging time with the same charger. However, most lithium-ion batteries charge faster initially (up to 80%) and then slow down for the final 20% to protect battery health. Determining Your Scooter’s Battery Capacity ● Check your user manual, specification sheet, or the battery label itself. As a rough estimate, 1Ah typically provides 3-5 miles of range, though this varies with riding conditions. Battery Capacity Charging Time (Standard) Charging Time (Fast) Estimated Range 4-6Ah 3-5 hours 1.5-3 hours 9-25 miles 7.5-10Ah 4-6 hours 2-4 hours 12-30 miles 10-15Ah 5-8 hours 2.5-5 hours 15-40 miles 15-20Ah 7-10 hours 3.5-6 hours 21-50 miles Remember that battery capacity degrades over time, affecting both charging time and range. 3. Will Charger Type Change Charging Speed? The charger type significantly impacts charging speed. This is where things get interesting. Standard vs. Fast Chargers ● Standard chargers (typically 1.5-2A output) prioritize battery longevity with slower charging. Fast chargers (3-5A or more) can reduce charging time by 40-60% but may affect long-term battery health. Dynamic Scooter provides an efficient standard charger, with faster options available for those prioritizing speed. Charging Time Differences by Wattage ● Higher wattage means faster charging. For example, doubling the charger’s wattage from 84W to 168W could potentially halve the charging time, assuming the battery can handle the increased power safely. Choosing the Right Charger ● Safety and compatibility are paramount. Always ensure the charger’s voltage matches your scooter’s battery voltage, the connector is compatible, and the current doesn’t exceed what your battery can safely handle. Stick with manufacturer-recommended chargers whenever possible. Charger Type Typical Power Charging Speed Impact on Battery Best For Standard Charger Low Slow Minimal Regular overnight charging Official Fast Medium-High Fast Moderate Occasional quick charging Third-Party Fast Very High Very Fast Potentially High Emergency use only (risky) Smart/Adjustable Variable Flexible Minimal-Moderate Optimizing charge/health For everyday charging, standard chargers are best for battery longevity. Save fast charging for when time is critical. 4. What Special Attention is Needed for the First Charge? The first charge sets the foundation for your battery’s health. Think of it as conditioning your battery. New Scooter First Charge Recommendations ● Most manufacturers recommend an extended first charge of 8-12 hours, even after the indicator shows full. This allows the Battery Management System to properly balance all cells in the battery pack, optimizing future performance. Optimal Duration for First Charge ● For lithium-ion batteries, 8-12 hours is typical; lead-acid batteries may need 12-24 hours. The key takeaway: don’t unplug when the light turns green – follow the manufacturer’s recommended duration for this critical first charge. Avoiding Common First Charge Mistakes ● Don’t use the scooter before the first full charge, don’t interrupt the charging process, always use the original charger, and ensure a suitable charging environment (moderate temperature, dry, well-ventilated). First Charge Action Recommendation Why It Matters Duration 8-12 hours (or per manual) Ensures proper cell balancing Charger Original only Guarantees compatibility and safety Environment 15-25°C, dry, ventilated Optimizes charging efficiency Interruptions None – complete cycle Allows full conditioning This small investment of time during the first charge pays dividends in battery performance and longevity. 5. How Can Electric Scooter Charging Time Be Shortened? Several strategies can reduce charging time when you’re in a hurry. Ready for the good part? Practical Fast Charging Techniques ● Using an official fast charger is the most direct method, potentially cutting charging time by 40-60%. Another approach is partial charging – since batteries charge fastest up to about 80%, stopping at this level can save 30-40% of

How Long Does It Take to Charge an Electric Scooter? Quick Guide (2026) Read More »

How Long Does an Electric Scooter Battery Last Per Charge?

Electric scooters have become a popular transportation option for short-distance travel. Let me break this down for you – understanding battery life helps you plan trips better and avoid getting stranded. Electric scooter batteries typically last between 5 to 40 miles per charge depending on various factors. Most commuter models average 15-25 miles under normal conditions. The actual range depends on battery capacity, rider weight, terrain type, weather conditions, and riding habits. But wait, there’s more to discover! Let’s explore exactly how these battery factors affect your daily rides. 1. What factors affect electric scooter battery range? You might be surprised by how many variables impact your electric scooter’s range. Battery performance is affected by numerous factors working together. The battery type and capacity serve as the foundation for range potential. Most electric scooters use lithium-ion batteries, measured in watt-hours (Wh). Higher capacity batteries store more energy, allowing for longer rides. Rider weight directly impacts range because heavier loads require more power. Most manufacturers test with riders weighing around 150-165 pounds. For every 20-30 pounds above this, expect a 5-10% decrease in range. Terrain dramatically affects battery consumption. Flat surfaces allow efficient energy use, while hills demand significantly more power. A 10% grade hill can reduce range by 50% compared to flat terrain. Factor Impact on Range Approximate Range Reduction Rider Weight Each 20-30 lbs over test weight 5-10% decrease Incline 10% grade hills Up to 50% decrease Speed Maximum speed vs. moderate speed 30-40% decrease Cold Weather Below 40°F/4°C 20-30% decrease Wind Strong headwind 10-15% decrease Speed significantly impacts range. Higher speeds require exponentially more power due to increased air resistance. Aggressive riding with frequent full-throttle acceleration can reduce range by 30-40%. Weather conditions play a crucial role. Cold temperatures particularly affect lithium-ion chemistry, temporarily reducing capacity. Riding in temperatures below 40°F (4°C) can decrease range by 20-30%. 2. What is the average battery runtime for different types of electric scooters? Here’s something you should know – not all electric scooters offer the same range capabilities. The market divides into three categories. Entry-level electric scooters typically offer ranges between 12-15 miles (19-24 km) per charge. These budget-friendly models usually feature smaller battery packs (250-300Wh) and take 4-5 hours to charge. Commuter electric scooters represent the mid-range segment with ranges between 15-30 miles (24-48 km). Battery capacities typically range from 350-600Wh with 5-7 hour charging times. Scooter Category Typical Range Battery Capacity Charging Time Average Price Entry-level 12-15 miles (19-24 km) 250-300Wh 4-5 hours $300-$500 Commuter 15-30 miles (24-48 km) 350-600Wh 5-7 hours $600-$1,200 Performance 30-60+ miles (48-97+ km) 700-1600Wh 8-12 hours $1,200-$3,000+ Dynamic Scooter Model B Up to 20 km (12 miles) Detachable lithium battery 3-4 hours $375.37 Performance electric scooters deliver impressive ranges between 30-60+ miles (48-97+ km). These premium models feature battery capacities exceeding 700Wh and weigh 60-100+ pounds. Dynamic Scooter Model B offers competitive range in the commuter category with up to 20 km (12 miles) per charge. Its detachable lithium battery allows convenient charging without moving the entire scooter. 3. How can you maximize your electric scooter’s battery life? Want to know the secret to getting more miles from each charge? Proper battery care and riding techniques can significantly extend your range. Adopt proper charging habits. Avoid letting your battery completely drain – lithium-ion batteries prefer partial discharge cycles. Maintain charge levels between 20% and 80% for optimal longevity. Use only the manufacturer-provided charger. Prevent complete discharge to protect your battery from damage. Lithium-ion batteries can suffer permanent capacity loss when fully depleted. Optimization Strategy Potential Range Increase Implementation Difficulty Maintain 20-80% charge 10-15% longer battery lifespan Easy Ride at moderate speeds 20-30% more range per charge Easy Proper tire inflation 5-10% more range per charge Easy Reduce unnecessary weight 5-15% more range per charge Moderate Coast whenever possible 10-20% more range per charge Easy Store your scooter at appropriate temperatures. Lithium-ion batteries prefer moderate temperatures between 50-77°F (10-25°C). Extreme heat accelerates degradation even when not in use. Adjust your riding habits. Accelerate gradually rather than applying full throttle. Maintain steady speeds instead of constantly varying pace. Keep tires properly inflated to reduce rolling resistance. 4. How long does it take to charge an electric scooter battery? You might wonder how long you’ll need to wait before riding again after depleting your battery. Charging times vary based on battery capacity and charger specifications. Different capacity batteries require different charging times. Entry-level scooters with 250-300Wh batteries typically charge in 3-5 hours. Mid-range commuter scooters with 350-600Wh batteries generally require 5-7 hours. High-performance models with 700-1600Wh packs may need 8-12 hours. Charger specifications significantly impact charging duration. Standard chargers typically output 1.5-2A, while fast chargers may deliver 3-5A or more. Battery Capacity Standard Charger (2A) Fast Charger (4A) Ultra-Fast Charger (6A) 250Wh (Small) 3-4 hours 1.5-2 hours 1-1.5 hours 500Wh (Medium) 6-7 hours 3-3.5 hours 2-2.5 hours 1000Wh (Large) 10-12 hours 5-6 hours 3.5-4 hours 1500Wh (XL) 15-18 hours 7.5-9 hours 5-6 hours Lithium-ion batteries charge in three main phases. The first phase (constant current) occurs when the battery is mostly depleted, charging relatively quickly to about 80% capacity. The second phase (constant voltage) slows down as the battery approaches full. The final phase (trickle charging) tops off the remaining capacity very slowly. First-time charging requires special attention. Many manufacturers recommend an initial charge of 8-12 hours to calibrate the battery management system. 5. How many charging cycles can an electric scooter battery last? Let’s talk about the long-term durability of your investment. Battery lifespan is measured in charging cycles. The average lifecycle of lithium-ion batteries typically ranges from 300 to 500 complete charging cycles before capacity noticeably decreases. After these cycles, batteries don’t suddenly fail but gradually lose capacity to about 70-80% of original. Several factors affect cycle life. Charging habits significantly impact lifespan – consistently charging from empty to full causes more stress than partial charging between 20% and 80%. Operating temperature plays a crucial role, with extreme heat accelerating degradation. Battery Usage Pattern

How Long Does an Electric Scooter Battery Last Per Charge? Read More »

How Far Can an Electric Scooter Go on One Charge? Complete Range Analysis

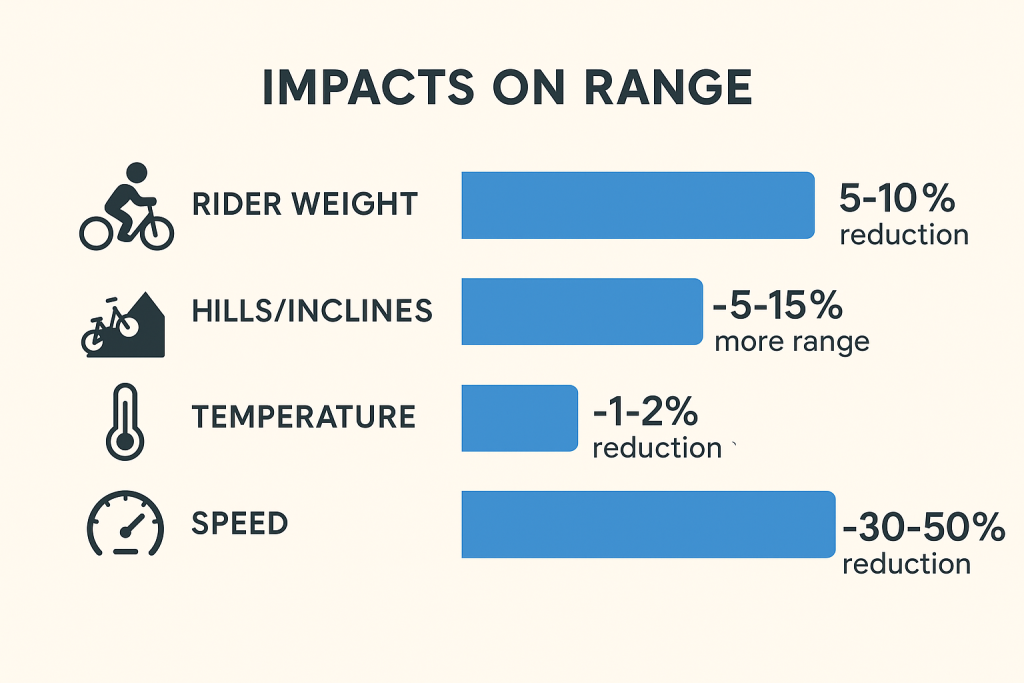
Electric scooters have transformed urban mobility with their convenience and eco-friendly nature. But one question remains at the forefront for potential buyers and current owners alike: How far can an electric scooter go on one charge? This comprehensive guide breaks down everything you need to know about electric scooter range. 1. What is the average range of electric scooters? The typical electric scooter can travel between 10 and 40 miles on a single charge, but this range varies dramatically across models and price points. Budget scooters often deliver 10-15 miles of range, while mid-tier options typically offer 15-25 miles. Premium models can reach impressive distances of 25-40+ miles per charge. You might wonder what causes such variation. Well, several factors come into play simultaneously. Battery capacity stands as the primary determinant – measured in watt-hours (Wh), higher capacity batteries store more energy and thus provide longer ranges. Most consumer electric scooters feature batteries ranging from 250Wh to 1000Wh. Motor efficiency also plays a crucial role in determining range. More efficient motors convert battery power into motion with less waste, allowing riders to travel farther on the same charge. Advanced models from companies like Dynamic Scooter incorporate sophisticated motor management systems that optimize power usage across various riding conditions. Price Range Typical Battery Capacity Expected Range Under $300 250-350Wh 8-12 miles $300-$500 350-450Wh 12-18 miles $500-$800 450-600Wh 15-25 miles $800+ 600-1000Wh+ 20-40+ miles 2. What factors affect electric scooter range? Battery capacity might seem like the obvious answer, but the story runs much deeper than just battery size. Think about this – two identical scooters with the same battery can achieve vastly different ranges depending on how and where they’re ridden. Rider weight significantly impacts range – heavier riders require more power to maintain speed. Most manufacturers test their scooters with riders weighing around 150-170 pounds. For every 20 pounds above this benchmark, expect a 5-10% reduction in range. Terrain type dramatically affects battery consumption. Flat, smooth surfaces allow for maximum efficiency, while hills and rough terrain drain batteries much faster. A scooter rated for 20 miles on flat ground might only achieve 10-12 miles on hilly terrain. Weather conditions play a surprisingly large role too. Cold temperatures temporarily reduce battery capacity – lithium-ion batteries perform best between 60-80°F (15-27°C). Riding in temperatures below 40°F (4°C) can decrease range by 20-30%. Factor Impact on Range Example Rider Weight 5-10% reduction per 20lbs over test weight 200lb rider = ~20% less range Hills/Inclines 5-15% reduction per degree of average incline 5° incline = 25-75% less range Temperature 1-2% reduction per degree below optimal 40°F = ~30% less range Speed Higher speeds = exponentially more power Max speed = 30-50% less range 3. How do different electric scooter brands compare in terms of range? Brand differences extend beyond marketing claims – engineering philosophy, component quality, and price positioning all influence range performance. Let’s examine how various market segments compare. High-end brands like Dualtron, Kaabo, and VSETT have built reputations around exceptional range capabilities. These premium scooters often feature dual motors, massive batteries (sometimes exceeding 1500Wh), and sophisticated battery management systems. Models like the Dualtron Thunder can achieve 50+ miles per charge. Mid-range manufacturers balance performance with affordability. Brands like Segway-Ninebot, Apollo, and Dynamic Scooter occupy this space with models offering 20-30 miles of real-world range. The Dynamic Scooter Model B exemplifies this category with its 20km (12 miles) range, striking an excellent balance between performance and price. Budget-friendly options from companies like Gotrax and Hiboy focus on accessibility with lower prices but modest range capabilities. These scooters typically deliver 8-15 miles per charge – sufficient for short commutes but potentially limiting for longer trips. 4. How can you accurately interpret manufacturer range claims? Manufacturer range claims require careful interpretation since testing methods vary widely across the industry. No standardized testing protocol exists for electric scooters, creating significant inconsistencies in how range figures are determined and reported. Most manufacturers test under ideal conditions: flat, smooth surfaces; moderate temperatures (65-75°F); riders at or below the weight testing standard (usually 150-170 pounds); and constant, moderate speeds (typically 10-15 mph). These controlled environments maximize range but rarely reflect real-world riding conditions. A good rule of thumb? Assume you’ll achieve 60-80% of the advertised range under typical conditions. For a scooter claiming 25 miles of range, expect 15-20 miles in real-world use. This mental adjustment helps avoid disappointment and ensures your scooter meets your actual transportation needs. Range Claim Type What It Usually Means How to Interpret “Up to X miles” Maximum possible under perfect conditions Expect 60-70% in real-world use “X miles (eco mode)” Slowest speed setting, flat terrain Realistic for slow, flat riding only “X-Y miles” Range from normal to eco mode Expect closer to X in typical use 5. How can you maximize your electric scooter’s range? Extending your scooter’s range doesn’t require technical expertise – simple riding habits and maintenance practices can significantly impact how far you can travel on a single charge. Let’s explore practical strategies that make a real difference. Riding technique profoundly affects battery consumption. Maintaining a steady, moderate speed conserves energy much more effectively than frequent acceleration and braking. Each time you accelerate, particularly from a complete stop, your scooter draws a surge of power from the battery. Speed selection represents the single most significant factor under rider control. Higher speeds require exponentially more power due to increased air resistance. Reducing speed from maximum to 75% can increase range by 30-50% in many cases. Battery maintenance practices preserve capacity over time. Lithium-ion batteries prefer partial discharge cycles rather than complete depletion. Avoiding regular deep discharges (below 10-20% capacity) extends battery lifespan and maintains maximum range capability. Range Extension Strategy Potential Impact Difficulty Level Ride at 75% of max speed 30-50% more range Easy Maintain steady speed 15-25% more range Moderate Keep tires properly inflated 5-15% more range Easy Use eco/battery saving mode 20-40% more range Easy 6. What usage scenarios are long-range electric scooters best suited for? Different riding

How Far Can an Electric Scooter Go on One Charge? Complete Range Analysis Read More »

How to Make Your Electric Scooter Faster: The Ultimate Guide

So, you feel a desire for speed on your electric scooter, eh? Many riders, after getting comfortable with their e-scooters, start wondering how to make electric scooter faster. This article is your comprehensive roadmap for understanding various methods available, from simple tweaks toward more involved modifications. We will look into battery upgrades, motor replacements, and even how your riding style can contribute. To make your electric scooter faster, upgrade the battery voltage, replace the motor with a more powerful one, optimize controller settings, maintain proper tire pressure, and adopt an aerodynamic riding posture. These methods combined can significantly increase speed, but always consider safety implications and local regulations before making modifications. Our main objective offers you safe, effective strategies for getting more pep from your personal transporter, while also considering legal and safety implications. You might be wondering if it’s even possible without breaking your bank or scooter. Let us find out! 1. What Are the Simplest Methods to Boost My Electric Scooter’s Speed? Getting a bit more zip from your electric scooter does not always mean a complete overhaul. Believe it or not, some simplest approaches can yield noticeable results in your quest for understanding how to make electric scooter faster. Before diving into complex hardware changes, it’s wise exploring these foundational aspects. Understanding your scooter’s current speed limitations and specifications First things first, you need know what you are working with. Every electric scooter model comes with factory-set speed limitations, often governed by local regulations or a manufacturer’s design choices for safety and component longevity. Check your scooter’s manual or a manufacturer’s website for its official top speed, motor power (usually in Watts), and battery voltage (V). Some scooters have different riding modes (e.g., Eco, Standard, Sport) that affect speed; ensure you are using a fastest mode if speed is your priority. Here’s the deal: knowing these baseline figures helps you set realistic expectations for how to make electric scooter faster and identify if your scooter is even underperforming. For instance, a scooter designed with a 250W motor and a 36V battery will have inherent limits that a simple software tweak might not overcome significantly. This knowledge prevents you from chasing impossible gains or potentially damaging your ride by pushing it beyond its designed capabilities. A clear grasp of current specs forms a bedrock for any speed enhancement project. Performing basic software or app-based adjustments (if available) Many modern electric scooters connect a smartphone app. What’s the real story? These apps sometimes offer settings that can influence performance, including speed. You might find options switching between performance modes, or in some cases, there might be firmware updates that could unlock a bit more speed or improve power delivery. Some manufacturers cap speeds via software complying with regional laws, and an update or a settings change (if permissible and available for your region) could alter this. However, be cautious with third-party apps or unofficial firmware, as these can void your warranty or even damage your scooter. Always prefer official channels for software modifications. For example, a popular scooter brand might release a firmware update that refines a motor control algorithm, leading toward a smoother and slightly faster acceleration. This presents a safe way exploring how to make electric scooter faster without touching any hardware. It’s always better checking for these options first. This method is often a first port of call for those seeking how to make electric scooter faster with minimal effort. Ensuring optimal scooter maintenance for peak performance (tire pressure, lubrication) It might surprise you, but regular maintenance plays a huge part in how fast your electric scooter can go. Underinflated tires, for example, create more rolling resistance, which directly slows you down and consumes more battery. Check your tire pressure regularly and inflate them toward a manufacturer’s recommended PSI. Proper lubrication of moving parts, like wheel bearings (if accessible) and any folding mechanisms, can also reduce friction. A clean scooter is often a happier, and slightly faster, scooter. Think of it like this: an athlete would not perform their best if they were out of shape or their equipment was faulty. The same applies toward your e-scooter. Ensuring all components are in top condition is a fundamental aspect of maximizing its current potential and a key consideration when thinking about how to make electric scooter faster. A well-maintained scooter is also a safer scooter, which is paramount when you start increasing speeds. Neglecting maintenance is a common pitfall when attempting how to make electric scooter faster. Table 1: Basic Speed Enhancement Checklist Check Item Action Required Potential Impact on Speed Cost Riding Mode Select “Sport” or highest performance mode via app/display Moderate Free Tire Pressure Inflate toward manufacturer’s recommended PSI Noticeable Free Software/Firmware Update Check official app for updates Minor to Moderate Free Basic Lubrication Lubricate bearings (if applicable), moving parts Minor Low Scooter Cleanliness Keep scooter clean, especially wheels and drivetrain Minor Free 2. How Does Upgrading the Battery Impact My E-Scooter’s Velocity? When basic tweaks are not enough, upgrading your scooter’s battery is often a next logical step for those serious about how to make electric scooter faster. A battery is a heart of your e-scooter, providing power that dictates its performance. But here’s the kicker: not all battery upgrades are equal, and understanding a science behind them is vital. A more powerful battery can significantly boost your scooter’s acceleration and top speed, but it also comes with considerations like compatibility, safety, and cost. This modification is more involved than software adjustments or maintenance, requiring a degree of technical understanding or professional help. Many enthusiasts find this upgrade offers one of most significant gains when researching how to make electric scooter faster. The relationship between battery voltage (V), capacity (Ah), and scooter speed Higher voltage (V) generally translates directly toward higher top speed. If your scooter’s motor and controller can handle it, increasing battery voltage (e.g., from 36V up to 48V) will make a motor spin faster, thus increasing your scooter’s speed. Battery

How to Make Your Electric Scooter Faster: The Ultimate Guide Read More »

How to Turn On Your Electric Scooter: A Beginnerʼs Guide to Getting Started

Scooter won’t start? Ride ruined, safety risk! Learn to power on your electric scooter correctly. This guide ensures safe, smooth starts every time. Turning on your electric scooter involves pre-ride checks, locating and pressing the power button (often on handlebars), understanding display indicators, ensuring sufficient battery, and knowing its starting mode (kick-start/zero start). Master your scooter’s startup by performing pre-ride checks (tires, brakes), using the power button correctly (press-and-hold), deciphering display symbols (battery, mode), and understanding its starting mechanism. Now that you know the basic steps, let’s dive deeper into each aspect. Properly powering up isn’t just about pressing a button; it’s about ensuring your safety, prolonging your scooter’s life, and guaranteeing every ride is a pleasure. This comprehensive guide will walk you through everything, from essential pre-ride inspections to understanding what those flashing lights on your display really mean, ensuring you become a confident and informed rider. 1. What Should I Check Before I Even Think About Turning On My Electric Scooter? Before powering on, do pre-ride checks. Check tire inflation. Test brakes – they should be firm. For Dynamic Scooters with dual brakes, check both. Inspect the folding mechanism; ensure it’s locked. Check for loose parts. Glance for damage. Wear closed-toe shoes and a helmet. Clear your path. These steps ensure you and your Dynamic Scooter are ready for a safe journey, leveraging features like its 25kph top speed responsibly. Pre-Ride Safety Checklist Check Item What to Look For Importance Tire Pressure Properly inflated Affects handling, range, puncture risk. Brakes Firm levers, effective stopping Crucial for safety. Folding Mechanism Securely latched Prevents wobbling. Loose Parts Solid components Indicates structural integrity. Visible Damage No cracks, dents Ensures scooter is sound. Personal Safety Gear Helmet, appropriate footwear Protects rider. Path Clearance Clear of obstacles Prevents immediate hazards. 2. Where is the Power Button Typically Located on an Electric Scooter like the Dynamic Scooter Model B? Find the power button. On models like Dynamic Scooter Model B, it’s often on the handlebar console, near display/throttle/brakes, or on the stem. The Model B manual confirms handlebar location. It’s usually marked with the power symbol. Familiarize yourself with its feel (press vs. press-and-hold). Knowing its location is fundamental. Common Power Button Locations & Identifiers Location Cues / Icons Dynamic Scooter Model B Notes Handlebar Console Near display, power symbol Most probable, near the central LED screen. Scooter Stem Sleekly integrated Secondary location to check. Appearance Different color/material, backlit, tactile Designed for durability, often IP54 rated. Unresponsive Check for debris, clean fingers, do not force Consult manual or customer support if issues persist. 3. How Do I Correctly Turn On My Dynamic Scooter Model B? To power on your Dynamic Scooter Model B: the manual states a power button press turns on the display. Most scooters need a 1-2 second press-and-hold. Watch the LED screen for battery/speed mode and listen for beeps. A stable display means it’s on. Verify battery level. Test throttle/brakes. If it powers on then off, charge the battery. This is key to learning how to turn on electric scooter models properly. Dynamic Scooter Model B: Power-On Sequence Example Step Action Expected Response Meaning 1 Locate power button Button visible and accessible Ready for user input. 2 Press & HOLD power button (1-3 secs) LED display illuminates, possible beeps Scooter systems are activating. 3 Release button once display active Display shows battery level, speed mode Scooter is powered on. 4 Quick check throttle/brake levers Levers feel responsive Physical controls seem operational. 5 Observe display for errors/warnings No error codes, battery level adequate Scooter is ready for mode selection and riding. 4. What Do the Display Indicators on My Dynamic Scooter Mean When It Powers On? Understand your Dynamic Scooter’s LED display. The manual details P-settings (P0: KPH/MPH, P1: cruise, P2: start mode). Key symbols: battery level, speed mode (Eco, Standard, Sport), speedometer, odometer, headlight status. Recognize error codes (E01, E02) or warning icons (wrench); consult manual or suppor if they appear. Cycle through info screens using mode/power button. This data access reflects modern scooter sophistication. Understanding Your Dynamic Scooter Display Indicator Type Symbols / Readouts Importance Battery Level Bars, %, Voltage Remaining charge, range planning. Speed Mode E, S/D, P/Sport Current performance setting. Speedometer kph / mph Current travel speed (P0 on Model B for KPH/MPH). Headlight Status Bulb icon Shows if lights are active. Errors/Warnings E01, E02, icons Indicates a system fault; consult manual or support. Odometer km / miles Tracks distance covered. Cruise Control Cruise icon Shows if cruise control is active (P1 on Model B). Starting Mode Icon/text Indicates if kick-start is required (P2 on Model B). 5. How Can I Ensure My Electric Scooter Battery is Sufficiently Charged Before Turning It On? Ensure your scooter battery is charged. Dynamic Scooter Model B (detachable lithium battery, Smart BMS) has clear indicators. Check display for battery level. Use the official charger (red light: charging, green: full). Charge after significant rides; avoid deep discharges. For long storage, aim for 40-60% charge. If issues, check connections, port; contact us, especially considering the battery warranty (often 12 months). Battery Check & Charging Best Practices Action Best Practice Importance for Dynamic Scooter Check Charge Before Ride View display indicator. Ensures sufficient range. Use Official Charger Use supplied charger or approved equivalent. Protects battery, ensures correct charging, maintains warranty. Monitor Charger Light Wait for green light. Confirms full charge, avoids undercharging. Charge After Rides Recharge after significant use. Prolongs lithium battery lifespan; Smart BMS assists. Long-Term Storage Store at 40-60% charge. Prevents battery degradation. Troubleshoot Charging Check connections, port; contact support if needed. Addresses common problems; allows warranty use. 6. Does My Electric Scooter Have Different Starting Modes (e.g., Kick-to-Start)? Understand starting modes. Electric Scooters may offer “zero start” (instant power) or “non-zero start” (kick-to-start). Model B manual: P2 setting for Auto Start (0) or Kick Start (1). Kick-to-start needs a manual push to ~3-5 kph before throttle engages; safer for beginners as it prevents accidental acceleration and allows smoother takeoff. Test mode

How to Turn On Your Electric Scooter: A Beginnerʼs Guide to Getting Started Read More »

How to Charge an Electric Scooter Without Its Charger

Losing your e-scooter charger is frustrating. This guide explores how to charge electric scooter without charger, covering alternative methods, risks, and essential safety. While an OEM charger is always best, understanding emergency options is vital. We will cover battery needs to knowing when to call professionals. Yes, charge an e-scooter without its original charger via a compatible universal charger, USB-PD (if supported), or an identical scooter charger. Prioritize safety: match voltage, amperage, and polarity precisely. OEM chargers are safest. Bottom line: charging without the dedicated charger needs extreme caution and knowledge to avoid damage or hazards. This guide aims to inform your decisions for safe power-up when your charger is missing. A rushed attempt can be severe; knowledge is your first defense. 1. What Are the Common Reasons for Needing to Charge an E-Scooter Without Its Charger? Several scenarios lead to needing to charge electric scooter without charger. It happens. Misplacing or forgetting the charger is common. Chargers can also suddenly malfunction. Some riders intentionally leave bulky chargers behind to travel light. Emergencies also arise: far from home, low battery, charger inaccessible. In these cases, finding alternative ways to charge electric scooter without charger becomes urgent. Knowing safe methods is key to avoid turning inconvenience into a costly mistake. 2. Can You Really Charge an Electric Scooter Safely Without the Original Charger? Safely trying to charge electric scooter without charger is complex and risky. Caution is paramount. While technically possible, it introduces variables compromising safety. The main concern is matching battery electrical needs: correct voltage (V), amperage (A), connector, and critical polarity. An OEM charger guarantees this, working with the scooter’s Battery Management System (BMS). Alternatives bypass this. Risks include frying the BMS/battery with wrong voltage, overheating with wrong amperage, arcing with ill-fitting connectors, or catastrophic damage from reversed polarity. Manufacturers warn against non-approved chargers, voiding warranties. So, while you might find ways, consider it only in emergencies, with full understanding of battery needs, meticulous compatibility checks, and unwavering safety adherence. An OEM charger is always safest. 3. What Alternative Charging Methods Could Potentially Work for Electric Scooters? When you must charge electric scooter without charger, few alternatives exist, each with risks. Extreme caution needed. Universal chargers exist but quality varies; precise voltage, amperage, and correct polarity are critical and hard to guarantee. Mistakes are disastrous. USB charging is viable only if your model supports USB Power Delivery (USB-PD) for its main battery (uncommon but increasing). It’s slower and needs a high-power USB-PD source and certified cable. DIY solutions are exceptionally dangerous (shock, fire risk) and for experts only. Using another e-scooter’s charger is possible only if all specs (voltage, amperage, connector, polarity) are an exact match. Slight differences cause damage. Thorough research and electrical safety understanding are non-negotiable. The OEM charger remains the safest. 4. How Might a USB Port Be Utilized for E-Scooter Charging? Using a USB port to charge electric scooter without charger is appealing but limited. Not a universal fix. Confirm your model supports main battery charging via USB; most don’t (ports are for accessories). Some newer models use USB-C Power Delivery (PD). If so, you need a compatible high-wattage USB-C PD source (45W, 60W, 100W+) and a rated cable. Standard USB-A or low-wattage USB-C won’t work. USB-PD charging is much slower than dedicated AC chargers, suitable for emergency top-ups. Use certified chargers/cables, ensure compatible voltage (PD negotiates), and monitor for overheating. Always verify scooter manual compatibility. 5. Is It Ever Safe to Employ a Universal Charger for Your Electric Scooter? Using a universal charger to charge electric scooter without charger is perilous; safety is conditional. High-stakes gamble. Precisely matching voltage (V) and amperage (A) is vital. Too high voltage fries components; too low won’t charge. Amperage should match or be slightly higher; lower means slow charging and charger overheating. Correct connector type is key. Crucially, correct polarity is non-negotiable; reversed polarity causes instant, severe damage (fire, short circuits). If considering a universal charger as a last resort: choose high-quality, reputable brands with clear markings/safety certifications. Meticulously set correct voltage. Triple-check polarity (use a multimeter if proficient). Ensure perfect connector fit. Never leave unattended; monitor constantly. It remains risky versus an OEM charger. 6. What Specific Dangers Are Associated with Improvised or DIY E-Scooter Charging Setups? Improvised or DIY setups to charge electric scooter without charger are exceptionally dangerous for non-experts. Do not attempt. Risks include severe electrical shock from high DC voltages (36V+). DIY setups lack control circuitry, leading to battery overcharging (damaging cells, causing overheating, fire/explosion) or deep discharge. Short circuits from improvised wiring cause intense heat and fire. Such methods will void warranties. Commercial chargers have multiple safety layers; bypassing these is unsafe. The potential for catastrophic failure is too high. DIY Charging Danger Description of Risk Why It\’s Critical to Avoid for Non-Experts Electrical Shock Direct contact with high-voltage DC can cause severe injury or fatality. Lack of training, safety gear, and controlled environment. Battery Overcharge/Deep Discharge Incorrect voltage/current damages cells, causes overheating, swelling, or failure. DIY setups lack precise control and safety cutoffs of BMS/OEM chargers. Overheating & Thermal Runaway Excessive heat from improper charging leads to fire/explosion. Battery chemistry is sensitive; heat degrades and can ignite cells. Short Circuits Unintended current paths cause massive heat, fire, or explosion. Improvised wiring, loose connections, unsuitable materials are common. Voiding Warranty Unauthorized modifications/charging methods nullify manufacturer coverage. Manufacturers don\’t cover damage from non-approved practices. 7. How Can You Accurately Match Voltage and Amperage When Considering an Alternative Charger? To charge electric scooter without charger safely with an alternative, accurately matching voltage/amperage is paramount. Crucial for safety. Locate battery specs: manual, original charger label (OUTPUT V/A), battery casing, or manufacturer site. Understand roles: Voltage (V) = electrical pressure; must match battery needs precisely (e.g., 36V battery often uses 42V charger). Too high fries circuits; too low won’t charge. Amperage (A) = current flow; ideally match original or be slightly higher. Lower amperage means slow charging and charger overheating. Mismatched voltage is more critical,

How to Charge an Electric Scooter Without Its Charger Read More »

How to Reset an Electric Scooter: Easy Steps

Is your electric scooter acting erratically, showing odd errors, or not responding? It’s a common headache. Many riders face these issues. Often, a simple reset is the answer. This guide, “How to Reset an Electric Scooter: Easy Steps,” clarifies this vital procedure. We explore why a reset becomes necessary, how to spot signs, essential pre-checks, and the general method to how to reset electric scooter units. Our aim is to equip you with clear steps for restoring your scooter’s smooth operation. To reset an electric scooter, first power it off. Then, either press and hold its dedicated reset button, or perform a specific manufacturer-recommended sequence of control inputs (like brake, throttle, and power button). Refer to your scooter’s manual for precise model-specific instructions to resolve software glitches. 1. Why Might My Electric Scooter Need a Reset? Your electric scooter suddenly misbehaving? What gives? Before costly repairs, consider software glitches. Modern e-scooters are complex, with firmware managing power, battery, and displays, leading to occasional digital hiccups. A reset acts like a digital refresh, clearing glitches without physical intervention, much like rebooting a computer. This can be effective for problems seeming like major hardware failures. Learning how to reset electric scooter devices saves time and money. Many issues, like failing to power on/off, erratic motor engagement, or poor app connectivity, stem from software. Persistent error codes or performance issues like reduced speed or inaccurate battery display also indicate a reset. Unresponsive controls or startup failures are critical software-related signs. A system reset attempts to restore firmware to a stable state. Knowing how to reset electric scooter units is fundamental. 2. What Are Telltale Signs Indicating an Electric Scooter Reset is Necessary? Recognizing when your e-scooter needs a reset is crucial. It’s not always obvious. Some issues clearly point to software, others are subtle. Paying attention to operational quirks and error indicators helps. One direct sign is persistent error messages or unusual blinking light patterns. If an error code (like E1, E2) lingers, or lights blink in an undocumented pattern, a software glitch is probable. A reset can clear these. Another clear sign is misbehavior with power functions – failing to turn on/off or doing so unexpectedly. Before suspecting a dead battery, try a reset. Unusual battery behavior, like rapid draining or incorrect charge readings, can also be a software issue in the BMS or controller. A reset can clear erroneous calibration data. For smart scooters, consistent failure to connect with companion apps indicates software trouble. A reset can refresh communication pathways. Sudden power loss or erratic speed fluctuations are unsettling. These can point to the controller’s inability to manage motor output due to software glitches. Always check wiring first, but a reset is a viable step. Understanding how to reset electric scooter units for such issues is key. Sign Indicating Reset Needed Common Symptoms Potential Software Cause Persistent Error Codes/Lights Unresolved error messages, unlisted blink patterns Corrupted error log, stuck diagnostic routine Power Function Issues Fails to turn on/off, unresponsive power button Corrupted power management firmware Unusual Battery Behavior Rapid drain, inaccurate charge levels Miscalibrated BMS data, software glitch in power monitoring App Connectivity Problems Fails to pair, frequent disconnections Bluetooth firmware issue, controller communication error Sudden Power Loss/Erratic Speed Unexpected deceleration, motor cut-out, inconsistent speed Motor controller software glitch, sensor misinterpretation 3. What Preparatory Checks Should I Perform Before Resetting My Electric Scooter? Suspect a reset is needed? Hold on! Perform crucial preparatory checks first. These ensure the reset goes smoothly and protect your scooter and yourself. First, check battery level. Attempting a reset with very low charge (below 20-30%) is problematic as the process might require sustained power, and an interruption could corrupt firmware. Charge it if low. This is vital for how to reset electric scooter devices safely. Next, a thorough visual inspection. Look for loose wires or damaged components. Symptoms mimicking software glitches can be due to poor electrical connections. Addressing hardware issues first is crucial. Consult the official user manual. It’s your best guide. Manufacturers provide model-specific instructions and warnings. Ignoring it is risky. Finally, if your scooter has a companion app, check if you can back up customized settings. A factory reset will likely wipe these. Backing them up makes post-reset setup smoother. 4. How Can I Locate the Reset Procedure for My Specific Electric Scooter Model? Ready to find the reset procedure? This can be tricky. Reset methods for e-scooters vary widely. Prioritize official sources. Many scooters have a physical reset button, often small and recessed, requiring a pin. Look near the charging port, under rubber flaps, or near the controller. Your user manual should show its location. The manufacturer’s official website, support portals, or FAQ sections are reliable sources. Go to the source. Search for your model for detailed guides. If no physical button, a specific sequence of control inputs (brake, throttle, power button) is likely. The user manual or support website is best. If official channels fail, online forums or YouTube can be resources. Community knowledge can help. Search for “[Your Scooter Model] reset.” Exercise caution with community-sourced info. Visual demos can be helpful for how to reset electric scooter steps. Information Source Type of Information Provided Reliability Notes Physical Reset Button Direct hardware interface for reset High (if present) Often hidden, requires pin; check manual. Manufacturer Official Website/Support Model-specific instructions, FAQs, manuals Very High Primary source for accurate, safe reset procedures. User Manual (Physical/Digital) Detailed steps, diagrams, warnings Very High First reference for how to reset electric scooter. Online Forums/User Groups Community-sourced tips, experiences Variable Cross-verify; good for supplementary info. YouTube Tutorials Visual demonstrations of reset procedures Variable Check uploader credibility; can be helpful visually. 5. What is the General Step-by-Step Guide to Resetting Most Electric Scooters? Now, the core process. Time to get hands-on, carefully. While specifics vary, a general framework applies. First, completely power off the scooter. This is fundamental. Ensure it’s fully shut down. If your scooter has a physical reset button, locate it. With the scooter off,

How to Reset an Electric Scooter: Easy Steps Read More »

Shopping Cart
Scroll to Top