...

September 10, 2026

Can Electric Scooters Really Support 300 Pounds Safely? Facts You Should Know

Heavy riders face real challenges finding electric scooters that work. Most models fail under extra weight. Poor performance and safety risks follow. The right heavy-duty scooter changes everything for larger riders. Electric scooters can safely support 300 pounds when built with reinforced frames, powerful motors, and quality components. Look for models rated above 330 pounds with dual motors and robust braking systems. Proper engineering makes the difference between safe riding and dangerous failures. But here’s the thing – not all “heavy-duty” scooters live up to their claims. 1. What Weight Capacity Do You Need in an Electric Scooter? Weight capacity means more than just standing on the deck. Dynamic forces during riding multiply the load significantly. Acceleration, braking, and turning create stress peaks that exceed static weight. Here’s why it matters – manufacturers test under controlled conditions. Real-world riding adds bumps, turns, and sudden stops. A 300-pound capacity scooter should handle 350+ pounds in testing. Safety margins protect riders and equipment. Smart buyers choose scooters rated 20-30% above their actual weight. This buffer accounts for gear, cargo, and riding dynamics. Weight Category Recommended Capacity Safety Margin 200 lbs rider 220+ lbs scooter 10% buffer 220 lbs rider 250+ lbs scooter 14% buffer 250 lbs rider 300+ lbs scooter 20% buffer Frame materials determine real capacity. Aluminum alloy works for lighter loads. Steel construction handles heavy-duty use better. Carbon fiber offers strength but costs more. Testing methods vary between brands. Some use static loads only. Others test dynamic riding conditions. Look for certifications from independent testing labs. 2. Which Electric Scooters Handle Heavy Riders Best? Premium models lead the heavy-duty market but come with steep prices. The Kaabo Wolf Warrior supports 330 pounds with dual 1200W motors at $2,500+. The Dualtron Thunder handles 350 pounds with advanced suspension at $3,000+. Mid-range options offer better value for most riders. The Xiaomi Pro 2 supports 220 pounds officially at $599. The Segway Ninebot Max supports 220 pounds with solid build quality at $799. The best part? Dynamic Scooter Model B delivers exceptional value at just $375.37 with 220-pound capacity. While other brands charge $600-800 for similar specs, Dynamic Scooter focuses on affordability without sacrificing quality. The Model B’s 600W motor provides ample power for riders up to 220 pounds. The reinforced aluminum frame and dual-brake system match features found in much more expensive models. Plus, you get 10% off with code SS10 and fast shipping for just $29.90. Price Range Weight Capacity Motor Power Best Value Pick $300-500 200-220 lbs 250-600W Dynamic Model B $375 $500-800 220-280 lbs 500-800W Xiaomi Pro 2 $599 $800-1200 280-330 lbs 600-1000W Segway Max $799 $1200+ 330-400 lbs 800W+ Kaabo Wolf $2500+ Here’s the deal – Dynamic Scooter proves you don’t need to spend $800+ for quality heavy-duty performance. The Model B costs half the price of comparable models while delivering the same core features that matter most. 3. How Does Rider Weight Affect Scooter Performance? Speed drops noticeably with heavier riders. A 150-pound rider might reach 25 mph while a 220-pound rider tops out at 20 mph on the same scooter. Range suffers even more than speed. Battery drain increases exponentially with weight. Expect 20-40% less range compared to manufacturer claims based on lighter test riders. Now, you might be wondering about hill climbing ability. Weight makes climbing much harder. A 10% grade that’s easy for light riders becomes challenging for heavy ones on underpowered scooters. Acceleration takes longer with more weight. Physics demands more energy to move heavier loads. Powerful motors compensate but drain batteries faster. Rider Weight Speed Loss Range Loss Hill Climbing 150 lbs Baseline Baseline 15% grade 180 lbs 10% 15% 12% grade 200 lbs 15% 25% 10% grade 220 lbs 20% 35% 8% grade Braking distance increases with weight and speed. Heavier riders need better brakes and longer stopping distances. Plan ahead for safe stops. Tire wear accelerates under heavy loads. Check pressure weekly and replace tires more often. Proper maintenance keeps performance up and prevents blowouts. 4. What Safety Features Matter Most for Heavy Riders? Braking systems become critical for heavy riders. Disc brakes outperform drum or electronic brakes significantly. Hydraulic disc brakes offer the best stopping power. Dual braking systems provide redundancy and balance. Front and rear brakes prevent wheel lockup while maximizing stopping force. Electronic regenerative braking helps but can’t replace mechanical systems. Let me explain why tire specifications matter so much. Larger tires (10+ inches) handle weight better than small ones. Pneumatic tires absorb shocks that solid tires transfer to the frame. Tire pressure affects everything from comfort to safety. Under-inflated tires overheat and fail. Over-inflated tires lose grip and ride harshly. Check pressure weekly. Brake Type Stopping Power Maintenance Weather Performance Hydraulic Disc Excellent Low Excellent Mechanical Disc Good Medium Good Drum Fair High Poor Electronic Only Poor Low Very Poor Frame construction determines crash safety. Welded joints should be smooth and strong. Folding mechanisms need robust locking systems that won’t fail under stress. Lighting systems help others see you. Bright LED headlights and taillights are mandatory for safety. Reflective elements add passive visibility. 5. How Do You Choose the Right Motor Power? Motor power directly affects performance under load. Heavy riders need at least 500W for decent performance. 600W+ motors handle hills and acceleration better. Single motors work for flat terrain and lighter loads. Dual motors provide better traction and power distribution. They also offer redundancy if one motor fails. This is important because motor placement affects handling. Rear motors provide better traction. Front motors can cause steering issues. Dual setups balance power and control. Torque specifications matter more than peak power. High torque motors accelerate better from stops. Look for motors with good low-end torque curves. Motor Setup Power Range Best For Pros Cons Single Rear 250-800W Commuting Simple, cheap Limited power Single Front 250-500W Light use Good steering Poor traction Dual 500-2000W+ Heavy riders Max power Complex, expensive Motor efficiency affects range significantly. Brushless motors last longer and run cooler than brushed types. […]

Can Electric Scooters Really Support 300 Pounds Safely? Facts You Should Know Read More »
How to Adjust Brakes on Electric Scooter: Step-by-Step Guide

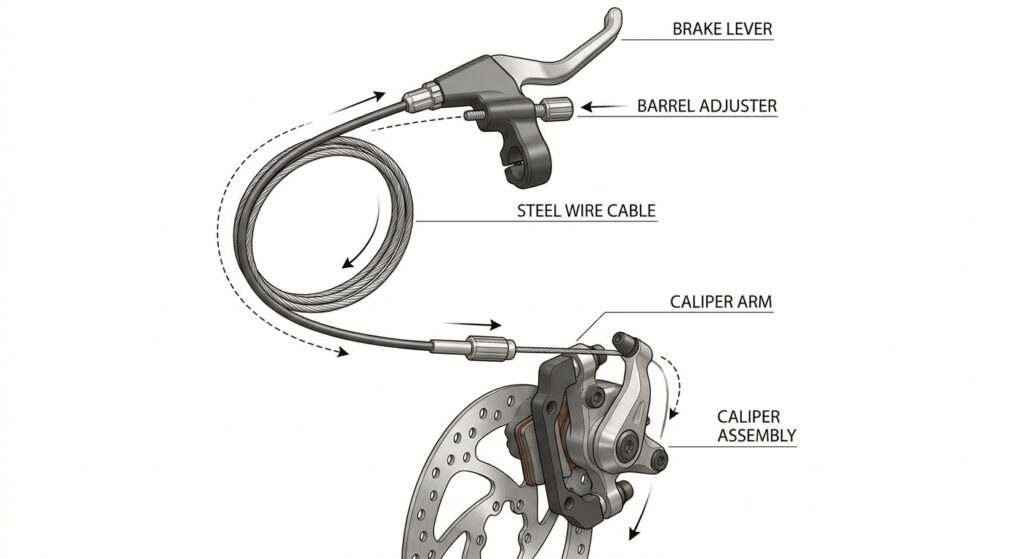
You can adjust brakes on an electric scooter by fine-tuning the barrel adjusters on your handlebars, centering the brake calipers, or tightening the physical brake cable tension at the wheel clamp. Imagine cruising down a busy city street on your daily commute, enjoying the morning breeze. Suddenly, a car door swings open in front of you, and you squeeze your brake levers hard—only to feel them pull completely flat against your handlebars with barely any stopping power. That terrifying sensation of sliding forward helplessly is a direct consequence of loose, unmaintained brakes. Fortunately, you can regain complete control of your ride with a quick and straightforward electric scooter brake adjustment designed to restore crisp, responsive braking on your high-performance Dynamic Scooter Model B. How do you start electric scooter brake adjustment? You start the process by identifying whether your scooter utilizes mechanical disc brakes, drum brakes, or electronic braking systems. Knowing your specific configuration allows you to choose the exact adjustment points and tools needed for the job. Before making any changes, securing a stable workspace where you can elevate your wheels is essential for a safe electric scooter brake adjustment. Proper preparation prevents accidental damage to your scooter’s delicate components. Once the wheels spin freely, you can safely test the current bite point of your levers. How do you identify your specific brake system type? Take a close look at your front and rear wheels to locate the stopping mechanisms. Disc brakes will feature a metallic circular rotor, whereas drum brakes are completely enclosed within the wheel hub. Here is the kicker: different brake types require completely unique tension adjustments to prevent dangerous pad rubbing. Knowing your exact configuration ensures you do not waste time turning the wrong adjustment screws. Let us review the most common setups you will encounter: Key Takeaway: Correctly identifying your brake type ensures you apply the precise adjustment method, keeping your daily city rides smooth and completely predictable. Brake Type Common Location Maintenance Frequency Major Benefit Mechanical Disc Front & Rear Monthly Ultimate stopping power Drum Brake Rear Wheel Quarterly Excellent weather resistance Regenerative Motor Hub Rarely Extends overall battery life Let us dive deeper into why staying on top of this routine maintenance keeps you safe on busy roads. Why is regular electric scooter brake adjustment vital? Regular maintenance is crucial because it directly prevents mechanical brake fade and guarantees your ability to make sudden, controlled emergency stops in traffic. Over time, constant friction wears down your brake pads and stretches the steel control cables. Neglecting an electric scooter brake adjustment leads to loose levers and dangerously long stopping distances. Proactive care keeps your vehicle operating efficiently while avoiding costly premature component wear. Keeping your braking system in prime condition protects both your safety and your wallet. How does proactive care protect your physical safety? Slowing down instantly can be the difference between a minor scare and a trip to the hospital. Think about it: city streets are packed with unpredictable pedestrians, unexpected potholes, and turning vehicles. A responsive brake setup gives you the split-second advantage needed to navigate these daily hazards. Key Takeaway: Prioritizing your braking system’s responsiveness guarantees peace of mind, transforming your urban commute into an enjoyable, stress-free experience. Safety Aspect Loose Brakes Properly Adjusted Brakes Stop Time Delayed reaction Instant deceleration Control High risk of skidding Smooth, modulated stopping Rider Anxiety Constant worry High confidence in traffic To get these premium results, you must gather the correct equipment before turning a single screw. What tools are used for electric scooter brake adjustment? You only need a few basic hand tools like metric hex keys, pliers, and an open-ended wrench to perform most adjustments at home. Having the correct tools on hand makes your regular electric scooter brake adjustment fast, clean, and highly effective. Using proper tools prevents you from stripping delicate aluminum bolts on your scooter’s caliper. It is always wise to keep a compact maintenance kit inside your backpack for quick repairs. What belongs in your DIY home maintenance toolkit? Most modern electric scooters utilize standardized metric fasteners. The best part? You probably already own the most important tools in your household toolbox. Gathering these essential items ahead of time ensures a smooth, uninterrupted tuning process: Key Takeaway: Assembling a basic toolkit allows you to handle routine maintenance instantly without paying expensive professional workshop fees. Tool Name Specific Size Primary Function Necessity Hex Keys 3mm, 4mm, 5mm Loosening calipers and pad bolts Mandatory Pliers Standard needle-nose Gripping and tensioning steel cables Highly Recommended Wrench 8mm / 10mm Tightening heavy-duty anchor clamps Mandatory for drum/cable With your tools neatly laid out, let us master the exact technique for adjusting cable-driven systems. How do you handle cable electric scooter brake adjustment? You handle cable adjustments by turning the threaded barrel adjusters on the handlebar or re-clamping the main cable wire at the wheel brake arm. This dual-method approach lets you perform both quick trailside tuning and deep mechanical electric scooter brake adjustment. Most loose levers can be fixed in seconds using the barrel adjuster. However, heavily stretched cables will require a physical reset at the lower anchor clamp. How do you tune the hand lever barrel adjusters? The barrel adjuster is the small threaded collar located where the brake cable enters your handlebar lever. Here is the deal: turning this collar counterclockwise increases cable tension and brings your brake pads closer to the stopping surface. This method is perfect for removing minor lever slack on your daily commute. Always remember to tighten the outer locking nut back down once you are finished. Key Takeaway: Mastering the barrel adjuster gives you the power to instantly eliminate sloppy lever play during quick commuting stops. Adjustment Step Action Direction Expected Result Step 1 Loosen lock ring Counterclockwise Frees the adjustment barrel Step 2 Spin barrel Counterclockwise Pulls cable tight / firms lever Step 3 Tighten lock ring Clockwise Prevents barrel from vibrating loose If your barrel adjuster is already unscrewed to its […]

How to Adjust Brakes on Electric Scooter: Step-by-Step Guide Read More »

Why Is My Electric Scooter Battery Draining So Fast?

Rapid electric scooter battery drain is typically caused by a combination of freezing temperatures, low tire pressure, excessive payload weight, high-speed riding modes, and natural lithium-ion cell degradation. You charge your electric scooter overnight, step onto the deck with high expectations, and set off on your daily commute. But within just a few blocks, you glance down and feel a wave of dread as your battery indicator starts flashing red. It is incredibly frustrating to be left stranded miles from your destination, forced to push a heavy, dead machine. Fortunately, you can easily identify the root causes of this energy loss and implement immediate fixes to restore your range. Does Cold Weather Speed Up Electric Scooter Battery Drain? Yes, freezing temperatures slow down internal chemical reactions, which triggers rapid electric scooter battery drain. When the weather drops below 15°C (59°F), the liquid electrolyte inside the cells becomes highly viscous. This sluggish state makes it extremely difficult for lithium ions to flow freely. As a result, your battery pack must work much harder and expend extra energy to deliver standard power. Storing your machine in unheated garages during winter can also cause permanent capacity losses. Microscopic tears can develop inside the cells when they are exposed to sub-zero environments. To prevent this, always bring your scooter indoors to keep its chemistry stable. Protecting the pack from extreme cold ensures you maintain optimal daily range. Why low temperatures freeze lithium-ion chemistry Cold temperatures increase the internal resistance within your battery pack significantly. This means the system loses a major portion of its energy as heat before it even reaches the motor.Here is the deal:You will often experience up to a 30% drop in range during freezing winter days. To combat this drop, store your scooter inside your home and only charge it at room temperature. You should also focus on maintaining standard riding habits during winter. Key Takeaway: Cold weather temporarily reduces your range by slowing down the essential chemical reactions, but storing the scooter indoors will fully protect its long-term health. Temperature Range Capacity Retention Immediate Operational Impact Recommended Action Above 20°C (68°F) 100% Optimal energy flow, maximum range Standard riding and charging habits 0°C to 10°C (32°F – 50°F) 75% – 85% Moderate voltage sag under load Store indoors, charge at room temp Below 0°C (32°F) 50% – 70% High risk of sudden shutdown Avoid riding if possible; insulate deck Understanding how climate affects your ride allows you to better manage your battery expectations during the winter months. Does Riding Uphill Cause Electric Scooter Battery Drain? Yes, conquering steep inclines demands massive motor effort, which directly accelerates electric scooter battery drain. When fighting gravity, your motor has to draw maximum electrical current from the cells to sustain momentum. This continuous peak amperage draw depletes your energy reserves far quicker than cruising on flat streets. If your commute involves constant climbing, you will notice your battery indicator dropping rapidly. This extreme energy transfer also generates excessive heat within the controller and motor windings. Operating at high temperatures decreases overall electrical efficiency, leading to further power loss. To safeguard your battery, you should plan flatter routes whenever possible. Reducing motor strain is a simple way to preserve your daily mileage. The heavy energy toll of fighting gravity When climbing, your motor operates outside of its peak RPM efficiency zone, converting precious energy into wasted heat.Think about it:A single steep hill can consume as much energy as two miles of flat-ground riding. To ease this burden, you can choose a high-performance, dual-motor model like the Dynamic Scooter for challenging terrains. You should also focus on basic physical assistance. Key Takeaway: Help your motor during steep climbs by kick-pushing to maintain speed and prevent heavy current spikes. Incline Angle (Degrees) Motor Effort Level Battery Consumption Rate Estimated Range Loss 0° (Flat Terrain) Low (Cruising) Standard baseline 0% (Baseline) 5° – 10° (Moderate Hill) Medium 1.5x baseline consumption 20% – 30% range reduction 15°+ (Steep Incline) Maximum 3x to 4x baseline consumption Up to 60% range reduction Since terrain gradients play a massive role in energy consumption, proper charging practices become your next line of defense. Can Overcharging Trigger Electric Scooter Battery Drain? Yes, leaving your charger connected for days on end degrades chemical cells, causing faster electric scooter battery drain over time. When a lithium-ion battery remains at maximum voltage, the internal components experience high chemical stress. This constant pressure accelerates the breakdown of the liquid electrolyte. Eventually, the damaged cells lose their ability to hold a full charge. Overcharging can also promote the formation of microscopic short circuits called dendrites. These tiny pathways allow energy to leak slowly even when your machine is turned off. To prevent this silent drain, always unplug your charger once the green indicator lights up. Proper charging habits are essential to extending your pack’s lifespan. How smart charging habits protect your cells Your Battery Management System (BMS) controls the energy flow, but manual care is still required.But wait, there’s more:Unplugging your charger early can actually double your battery’s total lifetime cycles. By managing your charging cycles responsibly, you preserve cell capacity and prevent range drops. Key Takeaway: Never leave your charger plugged in overnight to avoid keeping the cells under high-voltage stress. Charging State Voltage Strain Battery Wear Level Recommended Action Plan 0% to 80% (Bulk) Very Low Minimal wear on cells Ideal daily state for short commutes 80% to 100% (Saturation) High Moderate strain Charge fully, but do not leave connected Connected 24+ Hours Extremely High Accelerated degradation Use an outlet timer to auto-shutoff While charging habits protect internal chemistry, external mechanical factors like tires also dictate how fast your power drains. Can Flat Tires Accelerate Electric Scooter Battery Drain? Yes, riding on under-inflated tires creates massive rolling resistance, which triggers rapid electric scooter battery drain. When your tires lack proper air pressure, the rubber flattens against the pavement, increasing the contact patch. This friction forces your motor to pull twice as much current to maintain […]

Why Is My Electric Scooter Battery Draining So Fast? Read More »

Shopping Cart
Scroll to Top