You love your scooter, but you wish it could go further, climb hills with more gusto, or simply last as long as it did when it was new. The thought of a battery upgrade is tempting, but it seems like a complex, risky, and expensive endeavor reserved only for technical wizards.
Upgrading an electric scooter battery is an advanced DIY project that can significantly boost range and performance, but it carries serious risks, including fire hazards and damage to your scooter’s electronics if done incorrectly. It requires careful matching of voltage, size, and connectors, and a deep understanding of electrical safety.
So, is this a project you can tackle yourself? This guide will walk you through the critical considerations, from understanding the core specifications and choosing the right components to the step-by-step process of a safe installation.
1. Why would you want to upgrade your electric scooter battery?
The primary motivation for most riders to upgrade their scooter battery is the quest for more range. The amp-hour (Ah) rating of a battery is like the size of its fuel tank. By installing a battery with a higher Ah rating, you can significantly increase the distance you can travel on a single charge, unlocking longer commutes and more adventurous weekend rides. This is especially true for riders whose original battery has degraded over time, holding a fraction of its original capacity after years of use.
Beyond just range, a battery upgrade can also lead to a noticeable boost in performance. This is important because… a more powerful battery, particularly one with a higher discharge rate (or C-rating), can deliver more current to the motor. This translates into snappier acceleration from a standstill and, most importantly, better hill-climbing ability. A scooter that once struggled on steep inclines might conquer them with ease after an upgrade.
Finally, replacing a failing battery is often a better choice than replacing the entire scooter. If your scooter’s frame, motor, and brakes are still in good shape, a battery transplant can breathe new life into it for a fraction of the cost of a new machine. It’s a sustainable choice that can keep an otherwise perfectly good scooter out of the landfill while saving you money.
| Upgrade Motivation | Benefit | Technical Consideration |
| Increase Range | Ride longer distances on a single charge. | Choose a battery with a higher Amp-hour (Ah) rating. |
| Boost Performance | Improve acceleration and hill-climbing power. | Select a battery with a higher discharge rate (C-rating). |
| Replace Old Battery | Restore original performance and extend the scooter’s life. | Ensure the new battery is a compatible, high-quality replacement. |

2. What are the major risks of a DIY battery upgrade?
Before you start ordering parts, you must have a healthy respect for the dangers involved. Lithium-ion batteries are incredibly energy-dense, and mishandling them can have catastrophic consequences. The most severe risk is fire. Puncturing a cell, creating a short circuit by letting the positive and negative wires touch, or using an incompatible charger can all lead to a thermal runaway event—a violent, unstoppable chemical fire that is extremely difficult to extinguish.
You need to know this… performing a DIY upgrade will almost certainly void your scooter’s manufacturer warranty. If anything goes wrong with the scooter after your modification, even if it’s unrelated to the battery, the manufacturer will likely refuse to cover the repairs. This is a significant financial risk to consider before you begin.
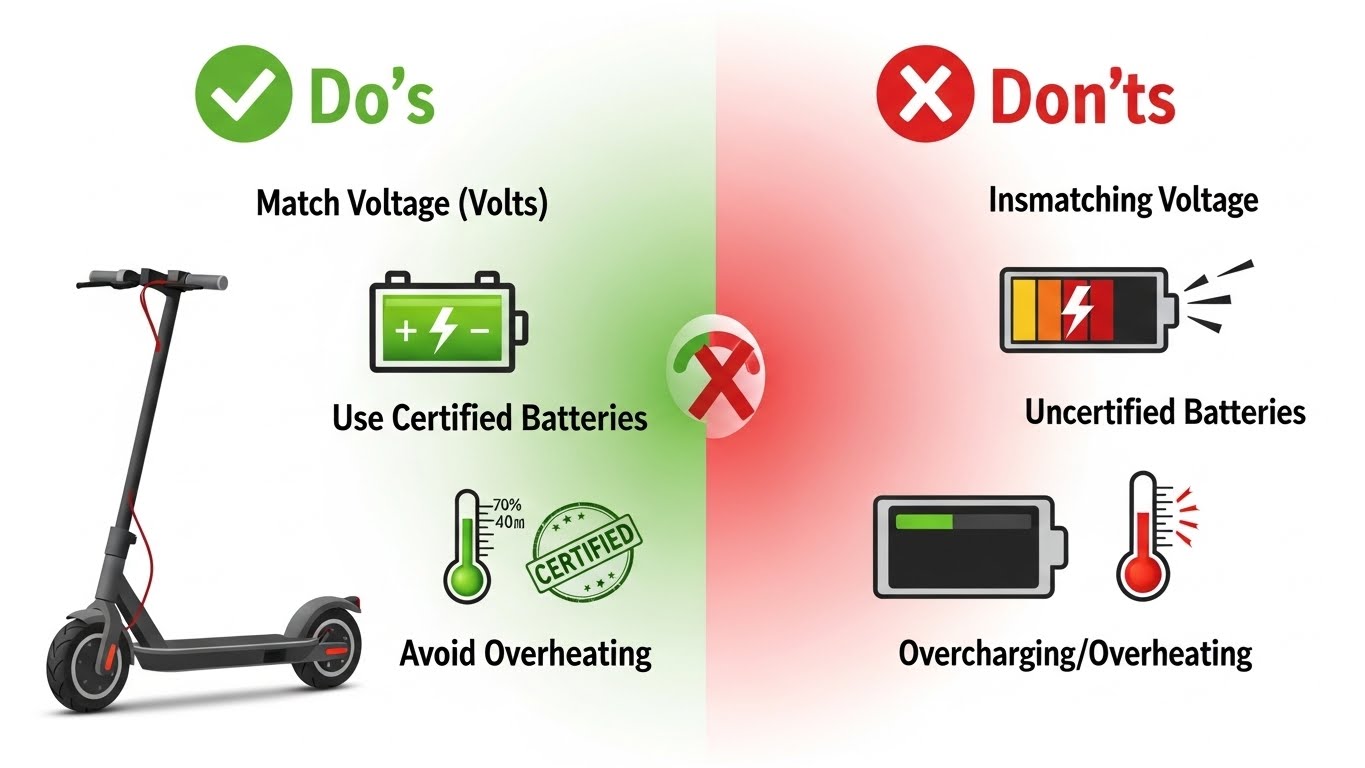
Compatibility issues are another major hurdle. If you install a battery with the wrong voltage, you can instantly destroy your scooter’s controller or motor. Even if the voltage is correct, the new battery’s physical dimensions might not fit in the scooter’s deck, or the connectors might not match. Forcing a battery into a space that’s too tight can lead to damage and create a fire hazard. This is not a project to be taken lightly or without proper research.
| Risk Category | Specific Danger | How to Mitigate |
| Safety | Fire, explosion, or electric shock from short circuits. | Use insulated tools, work in a clean space, and handle the battery with extreme care. |
| Financial | Voiding the manufacturer’s warranty. | Accept that you are taking full responsibility for any future repairs. |
| Technical | Damaging the scooter’s controller or motor. | Triple-check voltage compatibility and all connections before powering on. |
3. What key battery specifications must you understand?
To embark on a battery upgrade, you must first speak the language of batteries. There are a few core specifications that are non-negotiable to understand. The most important is Voltage (V). Think of voltage as the electrical pressure that pushes current through your scooter’s system. Your scooter’s controller and motor are designed to work with a specific voltage range, typically 24V, 36V, 48V, or 52V. Installing a battery with the wrong voltage will either fail to power your scooter or, worse, fry the electronics.
Amp-Hours (Ah) is the second critical specification. This represents the battery’s capacity—how much energy it can store. A 10Ah battery can theoretically deliver 10 amps of current for one hour, or 5 amps for two hours, and so on. Higher Ah ratings mean longer range. The third specification is the C-Rating, which indicates how quickly the battery can discharge. A higher C-rating means the battery can deliver more power to the motor, resulting in better acceleration and hill-climbing performance.
Finally, you need to understand the cell configuration, often written as something like “10S4P.” The “S” stands for series, meaning cells are wired positive-to-negative, which adds their voltages together. The “P” stands for parallel, meaning cells are wired positive-to-positive and negative-to-negative, which increases capacity without changing voltage. A 10S4P configuration means 10 cells in series (creating 37V nominal) with 4 parallel strings, resulting in a much higher capacity than a single string.
| Specification | What It Means | Why It Matters |
| Voltage (V) | Electrical pressure in the system. | Must match your scooter’s controller. Wrong voltage destroys electronics. |
| Amp-Hours (Ah) | Battery capacity or “fuel tank” size. | Higher Ah = longer range per charge. |
| C-Rating | Maximum discharge rate. | Higher C-rating = better acceleration and hill performance. |
| Configuration (S/P) | How cells are wired together. | Determines the final voltage and capacity of the pack. |

4. How do you choose the right replacement battery?
Choosing the right replacement battery is the most critical step in the entire upgrade process. The bottom line? You need to match your scooter’s voltage exactly. Open your scooter’s manual or look for a label on the battery compartment or controller that specifies the voltage. If you can’t find this information, you can measure it with a multimeter when the battery is fully charged. Write down this voltage—it’s non-negotiable.
Next, measure the physical dimensions of your scooter’s battery compartment. You need the length, width, and height. Many aftermarket batteries are available in different sizes, and forcing a battery into a space that’s too small can damage both the battery and the scooter. Take photos of the battery compartment from multiple angles to help you visualize the space.
Identify the exact type of connectors your scooter uses. Common types include XT60, XT90, Anderson SB50, and proprietary connectors. The connector type must match, or you’ll need to solder new connectors onto the battery, which introduces additional risk and complexity. Look at your scooter’s charging port and the main power connector to identify what you’re working with.
Finally, decide whether you want a like-for-like replacement or an upgrade. A like-for-like replacement has the same voltage and similar Ah rating as the original. An upgrade would have the same voltage but higher Ah, or potentially a higher C-rating. Be cautious with upgrades—a battery that’s too powerful can stress your scooter’s motor and controller.
| Decision Point | What to Check | Why It’s Important |
| Voltage Match | Original battery label or manual specification. | Wrong voltage will damage or destroy the controller. |
| Physical Fit | Measure the battery compartment dimensions. | Battery must fit without forcing or modification. |
| Connector Type | Identify the charging and power connectors. | Connectors must match or require soldering. |
| Capacity Upgrade | Compare Ah ratings and C-ratings. | Ensure the new battery won’t overpower the motor or controller. |
5. What tools and materials are required for the job?
Before you begin the upgrade, gather all the necessary tools and materials. Safety should be your top priority, so start with protective equipment. You’ll need safety glasses to protect your eyes from any sparks or debris, and insulated gloves to prevent accidental electrical contact. A fire extinguisher rated for electrical fires (Class C) should be within arm’s reach while you work.
Want to know the secret? The right tools make all the difference. You’ll need a basic screwdriver set to open your scooter’s deck and access the battery compartment. A multimeter is absolutely essential—you’ll use it to verify voltage, check for continuity, and ensure proper polarity before connecting anything. Wire strippers will be necessary if you need to strip insulation from wires. If you need to solder new connectors onto the battery, you’ll need a soldering iron, solder, and a heat gun to apply heat shrink tubing.
Additional materials include heat shrink tubing in various sizes to insulate connections, zip ties to secure wires and prevent them from moving around, and mounting tape or foam padding to keep the battery stable inside the scooter’s deck. Some people also use silicone conformal coating to protect exposed electronics from moisture and corrosion.
| Tool/Material | Purpose | Why It’s Needed |
| Safety Glasses & Gloves | Protect eyes and hands from electrical hazards. | Prevents injury from sparks or accidental contact. |
| Multimeter | Measure voltage, check continuity, verify polarity. | Essential for confirming safe connections before powering on. |
| Screwdriver Set | Open the scooter deck and battery compartment. | Different screw types require different screwdriver sizes. |
| Wire Strippers & Soldering Iron | Prepare and connect wires if needed. | Necessary if you need to replace or modify connectors. |
| Heat Shrink Tubing & Zip Ties | Insulate and secure connections and wires. | Prevents short circuits and keeps components organized. |
6. How do you safely remove the old battery?
The process of removing the old battery must be done with extreme care. Start by taking detailed photos of the existing battery setup from multiple angles. Photograph the wiring connections, the position of the battery in the deck, and any mounting brackets or straps. These photos will be invaluable when you’re installing the new battery and trying to remember exactly how everything was arranged.
Next, power down your scooter completely and let it sit for at least 30 minutes. This allows any residual charge in the capacitors to dissipate safely. This is critical because… even after the scooter is off, there can still be electrical energy stored in the system that could cause a shock or spark.
Now, carefully open your scooter’s deck. Depending on your model, this might involve removing several screws or unclipping panels. Work slowly and keep track of where each screw came from. Once the deck is open, locate the battery’s main power connector. This is typically a large connector that supplies power to the controller and motor. Gently disconnect this connector by pulling straight out—never twist or force it.
Next, locate the charging port connector. This is usually a smaller connector that leads to the battery management system (BMS). Disconnect this as well. Now, carefully unmount the battery from its brackets or straps. Lift it slowly and steadily, supporting its weight with both hands. Place the old battery on a safe, stable surface away from your work area.
| Removal Step | Action | Safety Consideration |
| Document Setup | Take detailed photos of the battery and connections. | Photos help you remember the exact configuration. |
| Power Down | Turn off the scooter and wait 30 minutes. | Allows residual charge to dissipate safely. |
| Disconnect Power | Gently disconnect the main power connector. | Never force or twist connectors; pull straight out. |
| Disconnect Charging | Disconnect the charging port connector. | Prevents accidental power flow during removal. |
| Unmount Battery | Carefully lift the battery out of its compartment. | Support the weight with both hands; never drop it. |
7. What is a Battery Management System (BMS) and does it need an upgrade?
The Battery Management System (BMS) is a critical component that protects your battery from damage and your scooter from electrical faults. It monitors the voltage and current of each cell in the battery pack, ensuring they stay within safe limits. It also balances the cells, ensuring they all charge and discharge evenly. Without a BMS, a lithium-ion battery could overcharge, overdischarge, or develop internal imbalances that lead to failure or fire.
Pay close attention to this… the existing BMS in your scooter might not be compatible with a new battery, especially if you’re upgrading to a higher capacity or different configuration. The BMS is typically rated for a specific voltage range and maximum discharge current. If your new battery exceeds these ratings, the BMS might not provide adequate protection, or it might shut down the system prematurely.
If you’re replacing the battery with one that has a similar voltage and capacity, the existing BMS might work fine. However, if you’re upgrading to a significantly higher capacity or different configuration, you should consider replacing the BMS as well. A new BMS designed for your specific battery will provide better protection and performance. This adds to the cost and complexity of the upgrade, but it’s worth it for safety and reliability.
| BMS Consideration | Implication | Recommendation |
| Voltage Rating | BMS must handle the new battery’s voltage. | Verify that the existing BMS supports the new battery’s voltage range. |
| Current Rating | BMS must handle the new battery’s discharge current. | If upgrading to higher capacity, consider a new BMS. |
| Cell Balancing | BMS ensures all cells charge and discharge evenly. | A BMS designed for your battery configuration is ideal. |
8. How do you correctly install and secure the new battery?
Installing the new battery is where precision and attention to detail are paramount. Start by positioning the new battery in the scooter’s deck, using your photos of the old battery as a guide. Make sure it’s oriented correctly and positioned securely. If the battery doesn’t fit perfectly, do not force it. Forcing a battery into a tight space can damage the battery pack or create internal short circuits.
Once the battery is positioned, connect the charging port connector first. This is the lower-risk connection, and it allows you to verify that the BMS is functioning correctly before you connect the main power. Use your multimeter to verify that the voltage reading matches the battery’s rated voltage. If it doesn’t, stop immediately and investigate the problem before proceeding.
Now comes the critical moment: connecting the main power connector. This is important because… this is where a mistake can cause a catastrophic short circuit or fire. Double-check the polarity of the connector. Positive should connect to positive, and negative to negative. If you’re soldering new connectors, apply solder carefully and use heat shrink tubing to insulate the connection. Allow the solder to cool completely before proceeding.
Once the main power connector is secure, use zip ties to organize and secure all wires, ensuring they can’t move around or pinch. Use mounting tape or foam padding to keep the battery stable inside the deck. Ensure there’s no movement or rattling when you gently shake the scooter. Finally, close the scooter’s deck and secure all screws.
| Installation Step | Action | Critical Check |
| Position Battery | Place the battery in the deck, matching the original position. | Ensure it fits without forcing; do not damage the battery. |
| Connect Charging Port | Connect the BMS charging connector. | Verify voltage with a multimeter before proceeding. |
| Connect Main Power | Connect the main power connector, verifying polarity. | Double-check positive and negative connections. |
| Secure Wires | Use zip ties and padding to organize and stabilize. | Ensure no wires can pinch or move around. |

9. What post-installation checks are necessary before riding?
Before you take your scooter out for a test ride, you must perform several critical checks. The first is the “smoke test.” With the scooter still on the stand and the deck closed, turn on the power and listen carefully. You should hear the controller initialize, but you should not hear any buzzing, crackling, or smell any burning odors. If you notice any of these signs, turn off the power immediately and investigate the problem.
Next, test the charging port. Connect your scooter to the charger and let it charge for a few minutes. The charger should show that it’s actively charging, and you should not see any sparks or smell any burning. If everything looks good, disconnect the charger and check the battery voltage with your multimeter. It should be higher than before charging, confirming that the charging system is working.
Want to know the secret? Power on the scooter and check the display. The battery indicator should show a full or near-full charge. The throttle should respond smoothly and predictably. The brakes should work normally. If everything checks out, you’re ready for a short, low-speed test ride in a safe, flat area with no traffic. Start at a walking pace and gradually increase speed, listening for any unusual sounds and feeling for any unusual vibrations.
| Post-Installation Check | What to Look For | What It Indicates |
| Smoke Test | No burning smell, sparks, or unusual sounds. | Electrical connections are safe and correct. |
| Charging Test | Charger shows active charging; no sparks or smell. | Charging system is functioning properly. |
| Display Check | Battery indicator shows full charge; throttle responds. | BMS is communicating correctly with the controller. |
| Test Ride | Smooth acceleration, normal braking, no vibrations. | Scooter is safe and ready for regular use. |
10. How should you dispose of the old scooter battery?
Never, under any circumstances, throw a lithium-ion battery in the regular trash. These batteries contain toxic materials and can explode or catch fire in landfills or recycling facilities that aren’t equipped to handle them. They must be disposed of through proper e-waste recycling channels.
Start by searching for certified e-waste recycling centers in your area. Many municipalities have hazardous waste disposal sites that accept lithium-ion batteries. You can also check with local retailers like Best Buy, which often have battery recycling programs. Some scooter manufacturers and retailers also offer battery take-back programs.
This is critical because… before transporting the old battery, you should prepare it for safe transport. If the battery is damaged or swollen, place it in a non-metal container with sand or kitty litter to absorb any potential leaks. If it’s in good condition, you can simply place it in a plastic bag. Never transport a damaged battery in a sealed container, as pressure could build up and cause an explosion.
When you arrive at the recycling center, inform the staff that you have a lithium-ion battery. They’ll have procedures in place to handle it safely. They’ll extract valuable materials like cobalt, nickel, and lithium, which can be used to manufacture new batteries. By recycling responsibly, you’re not only protecting the environment but also supporting the circular economy of battery manufacturing.
| Disposal Step | Action | Why It Matters |
| Find Recycler | Search for certified e-waste recycling centers nearby. | Ensures the battery is handled safely and responsibly. |
| Prepare Battery | Place in a non-metal container if damaged; plastic bag if intact. | Prevents leaks and potential fires during transport. |
| Transport Safely | Never seal a damaged battery in a closed container. | Pressure buildup could cause an explosion. |
| Recycle Responsibly | Inform staff that it’s a lithium-ion battery. | They’ll extract valuable materials for new batteries. |

Conclusion
Upgrading an electric scooter battery is an ambitious project that can dramatically extend your scooter’s range and performance. However, it’s not a task to be undertaken lightly. The risks are real—fire, electrical damage, and warranty voidance are all genuine concerns. Success requires meticulous planning, a deep understanding of electrical systems, and an unwavering commitment to safety at every step. You must match the voltage precisely, verify all connections with a multimeter, and never take shortcuts.
If at any point you feel uncertain or uncomfortable, it’s better to seek professional help or consider purchasing a new scooter. But for those with the knowledge, patience, and respect for the risks involved, a DIY battery upgrade can be a rewarding and cost-effective way to breathe new life into a beloved scooter.
When you’re ready to explore premium scooter options with advanced battery technology, consider checking out Dynamic Scooter for models designed with upgradability and longevity in mind.

FAQ
Q1: Can I install a higher voltage battery to make my scooter faster?
No, absolutely not. Installing a higher voltage battery will destroy your scooter’s controller and motor. These components are designed for a specific voltage range. A 48V battery in a 36V scooter will instantly fry the electronics. Stick to the original voltage specification.
Q2: Will a bigger battery (more Ah) increase my scooter’s speed?
No, increasing the Ah rating will not increase your scooter’s top speed. Amp-hours determine range, not speed. Speed is determined by the motor’s power (watts) and the voltage of the system. A larger battery will give you a longer range at the same speed, but it won’t make you go faster.
Q3: Is it safe to build my own battery pack from individual cells?
Building a battery pack from individual cells is extremely dangerous and not recommended for most people. It requires specialized knowledge of cell chemistry, soldering, and BMS configuration. A single mistake can result in a fire or explosion. Unless you have professional experience, buy a pre-assembled battery pack from a reputable manufacturer.
Q4: How much does a professional battery upgrade service cost?
Professional battery upgrade services typically cost between $300 and $800, depending on the battery capacity and the complexity of the installation. This is more expensive than a DIY upgrade but eliminates the risk and provides a warranty on the work. It’s a worthwhile investment if you’re not confident in your technical abilities.
Q5: Will upgrading my battery void the scooter’s warranty?
Yes, almost certainly. Most manufacturers’ warranties explicitly exclude damage caused by modifications or third-party components. By upgrading your battery, you’re accepting full responsibility for any future repairs or issues with your scooter. Make sure you understand this risk before proceeding.